
Level:
Correct: 0
Incorrect: 0
Marks: 0/0
Exam Practice
Course:
Topics:
AQA GCSE Maths (Higher calculator) Smart practice A mixed round aimed at your weak spots
Unit 1
Number
Unit 2
Algebra
Unit 3
Ratio, proportion and rates of change
Unit 4
Geometry and measures
Unit 5
Probability
Unit 6
Statistics
Avg
score:
–
Topics
done:
0/97

Coordinates in four quadrants

Practise 18 exam-style questions on Coordinates in four quadrants for AQA GCSE Maths (Higher calculator). Write your answer as you would in the exam and get it marked in seconds against the mark scheme, point by point, with the Study Helper on hand if you get stuck.

  • 18 questions
  • 1–5 marks each
  • Instant marking
  • No sign-up needed
18 questions, marked as you go

Sample questions with model answers

Here are 4 of the questions in this topic, each with a model answer, an explanation of why it earns the marks and the mark scheme an examiner would use.

Question 1

1 mark

Point P is shown on the grid.

Sam says,
"The coordinates of P are (3, −2)."

What mistake has Sam made?
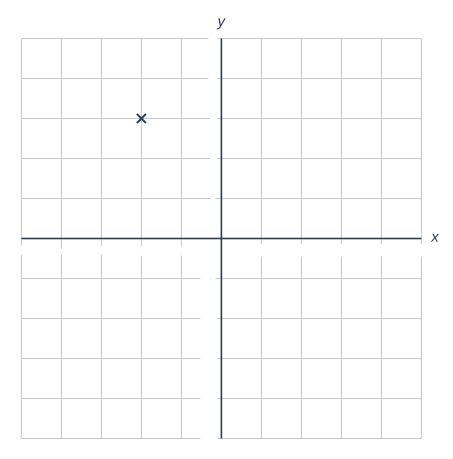
A coordinate grid with x from −5 to 5 and y from −5 to 5; each grid square is 1 unit across, and the axes cross at the origin O. Point P is marked with a cross; its coordinates can be read from the grid.

Model answer

Sam has written the coordinates the wrong way round. The x-coordinate (across) comes first and the y-coordinate (up or down) second.
P is 2 units to the left of the origin and 3 units up, so P is (−2, 3).

Explanation

Coordinates are always written (x, y): first the horizontal position, then the vertical position. Remember 'along the corridor, then up the stairs'. Swapping them gives a completely different point.

Mark scheme
  1. 1 mark

    B1 for explaining that he has written the coordinates the wrong way round (the x-coordinate comes first): P is (−2, 3)

    accept 'he has given the y-coordinate first' or 'he has swapped x and y' oe; just writing (−2, 3) with no explanation scores 0
Question 2

2 marks

Ella says,
"The points (−3, 4), (1, 1) and (5, −2) all lie on one straight line."

Is Ella correct?
You must show your working.

Model answer

From (−3, 4) to (1, 1): 4 across and 3 down
From (1, 1) to (5, −2): 4 across and 3 down
The steps are the same, so the gradient is the same \(\left(-\frac{3}{4}\right)\) and the line continues in the same direction through the middle point.
Yes, Ella is correct.

Explanation

Three points lie on one straight line if the steps between them are in the same direction, so the gradient from the first to the second equals the gradient from the second to the third. Equal steps also show that (1, 1) is the midpoint of the other two.

Mark scheme
  1. 1 mark

    M1 for the step from (−3, 4) to (1, 1) and the step from (1, 1) to (5, −2), both 4 across and 3 down; or both gradients \(-\frac{3}{4}\)

    or finding the line through two of the points, \(y = -\frac{3}{4}x + \frac{7}{4}\), and substituting the third

  2. 1 mark

    A1 for Yes, with correct supporting working

    answer only scores 0

Question 3

3 marks

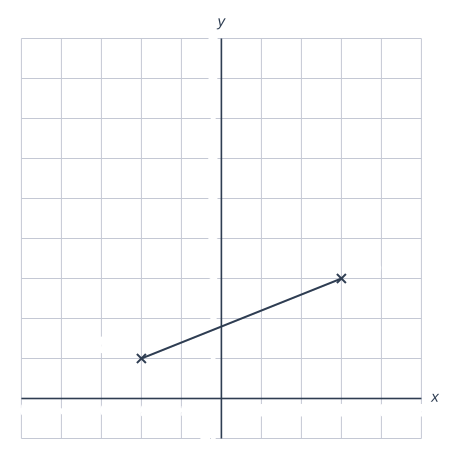
The diagram shows the points A(−2, 1) and B(3, 3).

AB is one side of a square ABCD.
The vertices C and D are above the line AB.

Work out the coordinates of C and D.

A coordinate grid with x from −5 to 5 and y from −1 to 9; each grid square is 1 unit across, and the axes cross at the origin O. Point A is marked with a cross at (−2, 1), labelled "A(−2, 1)". Point B is marked with a cross at (3, 3), labelled "B(3, 3)". A straight line segment joins A (−2, 1) to B (3, 3).

Model answer

From A to B: 5 right and 2 up.
Turning this through 90° anticlockwise gives 2 left and 5 up.
C = B + (2 left, 5 up) = (3 − 2, 3 + 5) = (1, 8)
D = A + (2 left, 5 up) = (−2 − 2, 1 + 5) = (−4, 6)

Explanation

The sides of a square are equal and meet at right angles. A step of 5 right and 2 up turned through 90° becomes 2 left and 5 up (swap the numbers and change one sign). Check: from D to C is 5 right and 2 up, the same as from A to B.

Mark scheme
  1. 1 mark

    M1 for the step from A to B (5 right, 2 up) and a perpendicular step of 2 left, 5 up used from A or B

  2. 1 mark

    A1 for C(1, 8)

  3. 1 mark

    A1 for D(−4, 6)

    SC1 for C(5, −2) and D(0, −4) (the square below AB), only if no other marks are awarded

Question 4

4 marks

A is the point (−2, 3) and B is the point (4, 6).
C is a point on the x-axis.
C is the same distance from A as it is from B.

Work out the coordinates of C.

Model answer

Let C = (x, 0)
\(AC^2 = (x + 2)^2 + (0 - 3)^2 = x^2 + 4x + 4 + 9 = x^2 + 4x + 13\)
\(BC^2 = (x - 4)^2 + (0 - 6)^2 = x^2 - 8x + 16 + 36 = x^2 - 8x + 52\)
\(x^2 + 4x + 13 = x^2 - 8x + 52\)
\(12x = 39\)
x = 3.25
C is the point (3.25, 0)

Explanation

Any point on the x-axis has y-coordinate 0, so call C (x, 0). Use Pythagoras' theorem to write the squared distances to A and B and set them equal; the \(x^2\) terms cancel. Check: \(AC^2 = 5.25^2 + 9 = 36.5625\) and \(BC^2 = 0.75^2 + 36 = 36.5625\).

Mark scheme
  1. 1 mark

    M1 for C = (x, 0) and one correct expression: \(AC^2 = (x + 2)^2 + 3^2\) or \(BC^2 = (x - 4)^2 + 6^2\)

    alternative: M1 for the midpoint of AB (1, 4.5) and the gradient of AB \(\frac{1}{2}\)

  2. 1 mark

    M1dep for \((x + 2)^2 + 9 = (x - 4)^2 + 36\)

    alternative: M1dep for the perpendicular bisector \(y - 4.5 = -2(x - 1)\)

  3. 1 mark

    M1dep for expanding and simplifying to a linear equation, e.g. 12x = 39

    alternative: M1dep for substituting y = 0

  4. 1 mark

    A1 for (3.25, 0)

    oe, e.g. \(\left(\frac{13}{4}, 0\right)\)

Ready to try the rest? Every answer you write is marked against the mark scheme, so you can see exactly where the marks are.

Study Helper Hints first, answers after you try

Stuck on this one? Ask for a hint and I’ll point you in the right direction, without giving the answer away. Once you’ve checked your answer, I’ll show you how the marks are awarded.