
Level:
Correct: 0
Incorrect: 0
Marks: 0/0
Exam Practice
Course:
Topics:
AQA GCSE Design and Technology Smart practice A mixed round aimed at your weak spots
Unit 1
Core technical principles
Unit 2
Specialist technical principles
Unit 3
Designing and making principles
Investigation, primary and secondary data
Environmental, social and economic challenge
Design strategies
Design strategies
Communication of design ideas
Prototype development
Selection of materials and components
Selecting materials and components for prototypes
Specialist tools and equipment
Avg
score:
–
Topics
done:
0/40

Wastage, addition, deforming and reforming processes

Practise 22 exam-style questions on Wastage, addition, deforming and reforming processes for AQA GCSE Design and Technology. Write your answer as you would in the exam and get it marked in seconds against the mark scheme, point by point, with the Study Helper on hand if you get stuck.

  • 22 questions
  • 1–8 marks each
  • Instant marking
  • No sign-up needed
20 questions, marked as you go

Sample questions with model answers

Here are 4 of the questions in this topic, each with a model answer, an explanation of why it earns the marks and the mark scheme an examiner would use.

Question 1

1 mark

Small holes are drilled through the bottom of the deep hollows in a vacuum forming mould.

Why are these holes needed?

Choose your answer.

  • To make the mould lighter and easier to lift
  • To let the polymer sheet cool down more quickly
  • To stop the formed sheet sticking to the mould
  • To let trapped air be drawn out of the hollows

Model answer

To let trapped air be drawn out of the hollows

Explanation

When the hot sheet seals over the mould, air in a hollow is trapped and cannot reach the vacuum pump, so the sheet will not be pulled into it. A small vent hole drilled through to the platen lets that air be sucked out, so the sheet forms right into the detail. The holes are kept small (about 1 mm across) so they do not leave marks on the formed sheet.

Mark scheme
  1. 1 mark

    To let trapped air be drawn out of the hollows

    If more than one option is given, 0 marks. Small vent holes make no useful difference to the weight of the mould. They do not speed up cooling. Release of the formed sheet depends on draft angles, rounded edges and a smooth surface, not on vent holes.
Question 2

2 marks

Tin snips and bench shears cut sheet metal by shearing.

Explain how a shearing action cuts the metal.

Model answer

The two hardened blades pass very close to each other, one above and one below the sheet. They push the metal in opposite directions along the cutting line, so one side of the sheet is forced to slide past the other until the metal fractures along that line.

Explanation

Shearing uses a pair of opposing forces acting across the material, unlike sawing, which removes a strip of material as swarf. The blades must pass close together with almost no gap, or the sheet bends and tears instead of cutting cleanly. 'The blades are sharp' does not explain how the cut happens.

Mark scheme
  1. 1 mark

    Two hard, sharp blades pass very close to each other, one on each side of the sheet

    Accept 'two blades move past each other like scissors'.

  2. 1 mark

    They apply equal and opposite forces that slide one part of the sheet past the other along the line between the blade edges, until the metal fractures there

    Accept 'the shear force breaks the metal along the cutting line', and credit 'no swarf or saw kerf is produced' as part of the development only if the forces are also described. Do not accept 'the blades are sharp' alone.

Question 3

3 marks

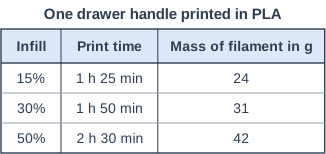
Kofi is 3D printing prototype drawer handles in PLA. The table shows the print time and the mass of filament for one handle at three infill settings.

He needs 5 handles, printed one after another. The printer can be left running for a maximum of 9 hours.

Work out the highest infill setting Kofi can use so that all 5 handles are printed within 9 hours. Show your working.

One drawer handle printed in PLA. Table with columns "Infill", "Print time", "Mass of filament in g". Infill: 15%; Print time: 1 h 25 min; Mass of filament in g: 24 | Infill: 30%; Print time: 1 h 50 min; Mass of filament in g: 31 | Infill: 50%; Print time: 2 h 30 min; Mass of filament in g: 42.

Model answer

30% infill: 5 × 1 h 50 min = 5 h 250 min = 9 h 10 min. This is more than 9 hours, so 30% is too slow (50% would take even longer: 12 h 30 min).
15% infill: 5 × 1 h 25 min = 5 h 125 min = 7 h 5 min. This is within 9 hours.

The highest infill setting Kofi can use is 15%.

Explanation

Multiply the time for one handle by 5 for each setting, convert every 60 minutes into an hour, and compare the total with the 9-hour limit. 30% infill fails by only 10 minutes, so careful conversion matters. A common error is to treat 1 h 50 min as 1.5 hours, which gives 7.5 hours and the wrong choice of 30%.

Mark scheme
  1. 1 mark

    Step 1: 30% infill: 5 × 1 h 50 min = 9 h 10 min (550 min), which is more than 9 hours (540 min)

    Award full marks for a correct answer, even with no working shown. Accept the comparison in minutes or hours. Working out 50% infill as well (5 × 2 h 30 min = 12 h 30 min, too long) is correct but does not earn this mark on its own.

  2. 1 mark

    Step 2: 15% infill: 5 × 1 h 25 min = 7 h 5 min (425 min), which is within 9 hours

    Accept 7.08 hours (accept [7.08, 7.09]).

  3. 1 mark

    Step 3: 15% infill is the highest setting that can be used

    ft from their totals: award for the highest infill whose total time they have shown to be 9 hours or less, provided hours and minutes have been converted correctly. Treating 1 h 50 min as 1.5 hours (7.5 hours, so 30% is chosen) earns no marks for Steps 1 and 3. The mass column is not needed.

Question 4

6 marks

Choose one of the following processes for making a prototype:

- laminating thin birch veneers to make a curved arm for a desk lamp
- decorating a cotton cushion panel using batik
- drape forming a sheet of 3 mm acrylic over a former to make a curved display stand.

Describe, in a logical sequence, how your chosen process is carried out. Name the equipment used.

Model answer

I have chosen laminating a curved lamp arm.

First I make a two-part former from layers of MDF, cut to the curve of the arm on the bandsaw, with the curve made slightly tighter than needed to allow for spring-back. I cover the faces of the former with parcel tape so the glue will not stick to it.

Next I cut six birch veneers about 10 mm oversize with a craft knife and a safety rule, all with the grain running along the length of the arm, so the curve is strong.

I spread PVA evenly on one face of each veneer with a small roller, then stack them, put the stack between the two halves of the former, and tighten G-cramps evenly, working from the middle outwards, until glue just squeezes out of every joint line. I leave it overnight so the adhesive cures fully.

When it is removed from the former, the arm keeps its curve. I mark the final width and cut it on the bandsaw, then plane and sand the edges through finer grades of abrasive paper ready for a finish.

Explanation

Top-level answers describe the stages in the right order with specific equipment (former, veneers, roller, cramps or vacuum bag; frame, wax pot, tjanting, cold-water dye; oven, felt-covered former, heat-resistant gloves) and explain key details such as grain direction, using cold dye, or not overheating the acrylic. Lists of steps with no equipment, or steps in the wrong order, stay in Level 1 or 2.

Mark scheme
  1. 6 marks

    Levels of response (6 marks).
    Level 3 (5-6 marks): A detailed description making several correct points for the selected process. Specific correct and appropriate process stages and specific equipment given, in a logical sequence.
    Level 2 (3-4 marks): A description with points showing some understanding of the selected process. Basic reference made to some stages of the process with some equipment given.
    Level 1 (1-2 marks): Simple notes showing limited understanding of the selected process.
    0 marks: No response or nothing worthy of credit.

    Indicative content (illustrative, not exhaustive; credit any worthy points made in support of the band descriptors): LAMINATING: make a former from MDF or plywood (a male and female pair, or one former used with cramps or a vacuum bag), allowing for a little spring-back; cut veneers slightly oversize with a craft knife or veneer saw; work out the number of layers for the thickness needed; lay the grain of the veneers along the length of the arm; cover the former with polythene or parcel tape so the glue does not stick to it; spread adhesive (PVA, urea-formaldehyde resin glue or epoxy) evenly on each face with a roller or spreader; stack the veneers; place in the former and cramp evenly from the centre outwards, or put in a vacuum bag; leave until the adhesive has fully cured (often overnight); remove, mark out and cut to shape on a bandsaw or with a coping saw, plane and sand the edges, then apply a finish; gloves and ventilation for resin adhesives. BATIK: wash the cotton to remove any finish (size) so wax and dye can penetrate; stretch it on a frame; draw the design lightly; melt batik wax (paraffin and beeswax) in a thermostatically controlled wax pot, never over a naked flame; apply the hot wax with a tjanting or brush to the areas to stay the base colour, checking it soaks right through (looks translucent); dye in a cold-water dye bath, or paint dye on, so the wax does not melt; rinse and dry; repeat waxing and dyeing from the lightest to the darkest colour; crack the wax for a crackle effect if wanted; remove the wax by ironing between sheets of absorbent paper (or boiling); fix the dye as instructed; burns from hot wax, ventilation, gloves and apron for dyes. DRAPE FORMING: make a smooth former of MDF or wood and cover it with felt or cloth so it does not mark the acrylic; cut the acrylic to size and finish its edges first; remove the protective film; heat the acrylic in an oven at about 150-170 °C until it is soft and floppy; wear heat-resistant gloves and lift it out with care; drape it over the former and smooth it down gently with a cloth or gloved hands (a matching top former can be pressed on); hold until it cools and sets; remove and check the shape; avoid overheating, which causes bubbles. Accept all other valid responses.

Ready to try the rest? Every answer you write is marked against the mark scheme, so you can see exactly where the marks are.

Study Helper Hints first, answers after you try

Stuck on this one? Ask for a hint and I’ll point you in the right direction, without giving the answer away. Once you’ve checked your answer, I’ll show you how the marks are awarded.