
Level:
Correct: 0
Incorrect: 0
Marks: 0/0
Exam Practice
Course:
Topics:
AQA GCSE Design and Technology Smart practice A mixed round aimed at your weak spots
Unit 1
Core technical principles
Unit 2
Specialist technical principles
Unit 3
Designing and making principles
Investigation, primary and secondary data
Environmental, social and economic challenge
Design strategies
Design strategies
Communication of design ideas
Prototype development
Selection of materials and components
Selecting materials and components for prototypes
Specialist tools and equipment
Avg
score:
–
Topics
done:
0/40

Specialist tools and equipment

Practise 20 exam-style questions on Specialist tools and equipment for AQA GCSE Design and Technology. Write your answer as you would in the exam and get it marked in seconds against the mark scheme, point by point, with the Study Helper on hand if you get stuck.

  • 20 questions
  • 1–8 marks each
  • Instant marking
  • No sign-up needed
20 questions, marked as you go

Sample questions with model answers

Here are 4 of the questions in this topic, each with a model answer, an explanation of why it earns the marks and the mark scheme an examiner would use.

Question 1

1 mark

In the hierarchy of control used when planning safe working, which control measure should be used only as a last resort?

Choose your answer.

  • Removing the hazard from the task completely
  • Fitting a fixed guard to the machine
  • Training and supervising everyone who uses it
  • Wearing personal protective equipment (PPE)

Model answer

Wearing personal protective equipment (PPE)

Explanation

The hierarchy of control is: eliminate the hazard, substitute something less hazardous, use engineering controls such as guards and dust extraction, then administrative controls such as training, and finally PPE. PPE is the last resort because it only protects the wearer, and only if it is worn correctly. It is still often needed alongside other controls, for example goggles on a pillar drill.

Mark scheme
  1. 1 mark

    Wearing personal protective equipment (PPE)

    If more than one option is given, 0 marks. 'Removing the hazard from the task completely' is wrong: elimination is the first and most effective control. 'Fitting a fixed guard to the machine' is wrong: guards are engineering controls, which come before procedures and PPE. 'Training and supervising everyone who uses it' is wrong: this is an administrative control, which comes before PPE.
Question 2

3 marks

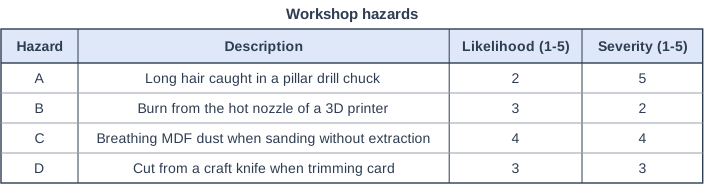
A D&T teacher is reviewing the risk assessment for a workshop. The table shows four hazards, with a score from 1 (low) to 5 (high) for how likely each is to cause harm and how severe the harm could be.

Risk rating = likelihood × severity

Calculate the risk rating for each hazard. Identify which hazard should be dealt with first, and suggest one control measure to reduce its risk.

Workshop hazards. Table with columns "Hazard", "Description", "Likelihood (1-5)", "Severity (1-5)". Hazard: A; Description: Long hair caught in a pillar drill chuck; Likelihood (1-5): 2; Severity (1-5): 5 | Hazard: B; Description: Burn from the hot nozzle of a 3D printer; Likelihood (1-5): 3; Severity (1-5): 2 | Hazard: C; Description: Breathing MDF dust when sanding without extraction; Likelihood (1-5): 4; Severity (1-5): 4 | Hazard: D; Description: Cut from a craft knife when trimming card; Likelihood (1-5): 3; Severity (1-5): 3.

Model answer

A: 2 × 5 = 10
B: 3 × 2 = 6
C: 4 × 4 = 16
D: 3 × 3 = 9

Hazard C, breathing MDF dust when sanding without extraction, has the highest risk rating (16), so it should be dealt with first. The sander should be connected to dust extraction (local exhaust ventilation), so the dust is captured where it is made.

Explanation

Multiplying likelihood by severity gives a risk rating that lets the teacher put hazards in order of priority. Hazard A is the most severe, but it is less likely, so its rating is lower than C. Control measures should follow the hierarchy of control: extraction (an engineering control) is better than relying only on a mask.

Mark scheme
  1. 1 mark

    risk ratings: A = 10, B = 6, C = 16, D = 9

    Award 1 mark for all four ratings correct. Award full marks for the calculation for correct values, even with no working shown.

  2. 1 mark

    hazard C (breathing MDF dust when sanding without extraction) should be dealt with first, as it has the highest risk rating

    ft their ratings: credit the hazard with the highest of their ratings.

  3. 1 mark

    a suitable control measure for hazard C, e.g. connect the sander to dust extraction (local exhaust ventilation) / only sand MDF on machines with working extraction / wear a suitable dust mask (respiratory protective equipment) as well as using extraction / clean up with a suitable vacuum cleaner, not by sweeping

    The control must suit the hazard identified (ft their hazard). Do not credit 'be careful' or 'open a window' alone. Accept all other valid responses.

Question 3

3 marks

A student is using a vinyl cutter to cut lettering from heat transfer vinyl (HTV), which will be ironed onto a T-shirt with a heat press.

Explain why the design must be mirrored before cutting, and why the blade settings should be checked with a test cut.

Model answer

HTV is loaded with its shiny carrier sheet face down, so the blade cuts the vinyl from the back. When the lettering is pressed onto the T-shirt it is turned over, so the design must be mirrored or the letters will be back to front. The blade must cut through the vinyl but not the carrier sheet. A small test cut, which is then weeded, shows whether the blade depth and force are right before the whole design is cut, so material is not wasted.

Explanation

Heat transfer vinyl is cut from the back and then flipped onto the garment, so mirroring is essential. A test cut checks that the cut is deep enough to weed easily but leaves the carrier sheet whole, which holds the letters in position for pressing. A common mistake is to think the design is mirrored only to save vinyl.

Mark scheme
  1. 1 mark

    the HTV is loaded with its shiny carrier sheet face down, so the blade cuts the vinyl from its back (adhesive side)

    Award 1 mark for each creditworthy point. A point explained in detail earns 2 marks. max 3. For 3 marks both parts (mirroring and the test cut) must be addressed.

  2. 1 mark

    the design is turned over when it is pressed onto the T-shirt, so it must be mirrored to read the right way round

    'Otherwise the letters will be back to front' earns this mark.

  3. 1 mark

    the blade depth and force must cut right through the vinyl but not through the carrier sheet (a 'kiss cut')

  4. 1 mark

    a small test cut, which is then weeded, shows whether the settings are right before the whole design is cut: too deep and the carrier is cut so the design falls apart; too shallow and the vinyl will not weed cleanly - saving material and time

    Accept all other valid responses.

Question 4

6 marks

Describe, in a logical sequence, how to drill a 6 mm hole accurately and safely through a sheet of 3 mm acrylic using a pillar drill.

Model answer

1. Leave the protective film on the acrylic, or cover the area with masking tape, so the surface is not scratched and the mark is easy to see.
2. Mark the centre of the hole with two crossing lines, using a steel rule and a fine marker. I would not centre punch the acrylic, because it could crack.
3. Select a sharp 6 mm high speed steel twist drill and check its size. Fit it in the chuck, tighten it with the chuck key and remove the key straight away.
4. Set a slow to moderate speed, because too high a speed would heat and melt the acrylic or make it crack.
5. Put a piece of scrap wood under the acrylic to support it, so the underside does not crack or chip as the drill breaks through, then clamp the acrylic and the scrap wood firmly in a machine vice. Never hold it by hand.
6. Put on goggles, tie back long hair, remove any loose clothing or jewellery, do not wear gloves, and lower the chuck guard.
7. Line up the drill point with the centre mark, switch on and feed the drill down slowly with light, even pressure, easing off as it breaks through.
8. Raise the drill, switch off and wait for the drill to stop before unclamping the work.
9. Brush away the swarf, remove any sharp edges from the hole with a countersink or file, then peel off the film.

Explanation

Level 3 needs the stages in a logical order with the specific equipment (machine vice, scrap wood backing, HSS drill, chuck key, guard) and the precautions that give an accurate, crack-free hole and keep the user safe. Key points for acrylic are a slow speed, a backing piece and easing off at breakthrough. A common mistake is to hold the sheet by hand or to centre punch the acrylic.

Mark scheme
  1. 6 marks

    Levels of response (6 marks).
    Level 3 (5-6 marks): A detailed description making several correct points for drilling the acrylic. Specific correct and appropriate process stages, in a logical sequence, and specific equipment given, including the safety precautions.
    Level 2 (3-4 marks): A description with points showing some understanding of drilling the acrylic. Basic reference made to some stages of the process with some equipment given.
    Level 1 (1-2 marks): Simple notes showing limited understanding of drilling the acrylic.
    0 marks: No response or nothing worthy of credit.

    Indicative content (illustrative, not exhaustive; credit any worthy points made in support of the band descriptors): Preparation: leave the protective film on, or apply masking tape, to protect the surface and make marking clearer; mark the centre of the hole accurately with crossed lines using a rule or try square and a fine marker or pencil (do not centre punch acrylic, as it may crack); select a sharp 6 mm HSS twist drill (or a drill ground for plastics), check its size, and possibly a smaller pilot drill first. Setting up: fit the drill in the chuck, tighten it with the chuck key and remove the key at once; set a slow to moderate speed so the acrylic does not overheat, melt or crack; place a piece of scrap wood under the acrylic to support it and stop it cracking or chipping as the drill breaks through; clamp the acrylic and scrap wood in a machine vice or to the table (never hold by hand); line up the drill point with the mark; use the depth stop or check the table height so the drill does not go into the vice or table. Safety: wear eye protection; tie back long hair and remove loose clothing and jewellery; no gloves; lower the chuck guard. Drilling: switch on; feed the drill down slowly with light, even pressure, easing off as it breaks through; raise the drill, switch off and wait for it to stop. Finishing: remove the swarf with a brush, not fingers; remove sharp edges from the hole (e.g. with a countersink bit by hand or a file); remove the film or tape. Level 3 needs most stages in a logical order with specific equipment and safety. Accept all other valid responses.

Ready to try the rest? Every answer you write is marked against the mark scheme, so you can see exactly where the marks are.

Study Helper Hints first, answers after you try

Stuck on this one? Ask for a hint and I’ll point you in the right direction, without giving the answer away. Once you’ve checked your answer, I’ll show you how the marks are awarded.