
Level:
Correct: 0
Incorrect: 0
Marks: 0/0
Exam Practice
Course:
Topics:
AQA GCSE Design and Technology Smart practice A mixed round aimed at your weak spots
Unit 1
Core technical principles
Unit 2
Specialist technical principles
Unit 3
Designing and making principles
Investigation, primary and secondary data
Environmental, social and economic challenge
Design strategies
Design strategies
Communication of design ideas
Prototype development
Selection of materials and components
Selecting materials and components for prototypes
Specialist tools and equipment
Avg
score:
–
Topics
done:
0/40

Specialist techniques, processes and finishes for prototypes

Practise 20 exam-style questions on Specialist techniques, processes and finishes for prototypes for AQA GCSE Design and Technology. Write your answer as you would in the exam and get it marked in seconds against the mark scheme, point by point, with the Study Helper on hand if you get stuck.

  • 20 questions
  • 1–8 marks each
  • Instant marking
  • No sign-up needed
20 questions, marked as you go

Sample questions with model answers

Here are 4 of the questions in this topic, each with a model answer, an explanation of why it earns the marks and the mark scheme an examiner would use.

Question 1

1 mark

Which order of abrasive paper grades should be used when preparing a planed pine surface for varnishing?

Choose your answer.

  • P240, then P180, then P120
  • P80 only
  • P80, then P240, then P120
  • P120, then P180, then P240

Model answer

P120, then P180, then P240

Explanation

The higher the grade number, the finer the abrasive. Each finer grade removes the scratches left by the previous one, so the surface gets smoother at every stage; skipping too many grades or going back to a coarse one leaves visible scratches. A very coarse grade such as P80 is only needed to remove deep marks or level a surface.

Mark scheme
  1. 1 mark

    P120, then P180, then P240

    If more than one option is given, 0 marks. Going from fine to coarse (P240 to P120) would leave the coarse scratches on the finished surface. P80 alone is very coarse and leaves deep scratches that show through varnish. Going back to a coarser grade (P240 then P120) undoes the work of the finer paper.
Question 2

2 marks

The corners of a box are joined with finger joints. The sides are 105 mm wide. Each corner has 7 fingers of equal width, and board A has a finger at both edges.

Work out the width of each finger, and how many fingers are cut on board A and on board B.

Model answer

Width of each finger = 105 ÷ 7 = 15 mm
Board A has a finger at both edges, so it has fingers in positions 1, 3, 5 and 7: 4 fingers.
Board B fills the gaps in positions 2, 4 and 6: 3 fingers.

Explanation

The fingers of the two boards alternate across the width, so 7 equal fingers share the 105 mm. With an odd number, the board that starts and ends with a finger has one more than the other. Marking out accurately from the same face edge with a square and marking gauge is what makes the fingers fit tightly.

Mark scheme
  1. 1 mark

    Width of each finger = 105 ÷ 7 = 15 mm

    Award full marks for correct answers, even with no working shown. Mark the number, not the units.

  2. 1 mark

    Board A has 4 fingers and board B has 3 fingers

    Both numbers are needed for this mark. Do not accept 3.5 each or 7 on each board.

Question 3

3 marks

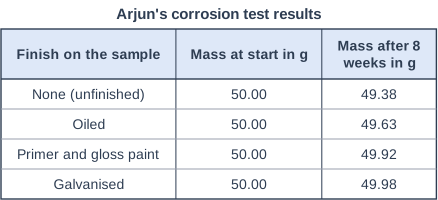
Arjun is choosing a finish for a mild steel prototype garden ornament. He tested four mild steel samples, each 50.00 g, by leaving them outdoors for eight weeks. He then removed any loose rust and weighed them again. The table shows his results.

Calculate the percentage loss in mass of the unfinished sample.

Use the results to state which finish gave the best protection.

Arjun's corrosion test results. Table with columns "Finish on the sample", "Mass at start in g", "Mass after 8 weeks in g". Finish on the sample: None (unfinished); Mass at start in g: 50.00; Mass after 8 weeks in g: 49.38 | Finish on the sample: Oiled; Mass at start in g: 50.00; Mass after 8 weeks in g: 49.63 | Finish on the sample: Primer and gloss paint; Mass at start in g: 50.00; Mass after 8 weeks in g: 49.92 | Finish on the sample: Galvanised; Mass at start in g: 50.00; Mass after 8 weeks in g: 49.98.

Model answer

Loss in mass = 50.00 - 49.38 = 0.62 g
Percentage loss = 0.62 ÷ 50.00 × 100 = 1.24%

The galvanised sample gave the best protection, because it lost the least mass (only 0.02 g).

Explanation

Percentage loss is the mass lost divided by the original mass, times 100. Corrosion turns steel into rust that falls away, so a bigger loss in mass means more corrosion. The oiled sample did poorly because oil is soon washed off outdoors, while zinc protects steel both as a barrier and sacrificially.

Mark scheme
  1. 1 mark

    Step 1: loss in mass = 50.00 - 49.38 = 0.62 g

    Award full marks for correct answers, even with no working shown.

  2. 1 mark

    Step 2: percentage loss = 0.62 ÷ 50.00 × 100 = 1.24%

    ft their loss ÷ 50 × 100. Do not accept 98.76% (the mass remaining). Mark the number, not the % sign.

  3. 1 mark

    Galvanised (zinc coated) sample

    It lost only 0.02 g (0.04%). Do not accept 'painted' (0.08 g) or 'oiled' (0.37 g).

Question 4

6 marks

Describe, in a logical sequence, how to mark out and cut a stopped mortise and tenon joint by hand to join a 69 × 20 mm pine rail to a 44 × 44 mm pine leg.

Name the tools used.

Model answer

I mark the face side and face edge on both the rail and the leg. On the rail I mark the shoulder line all round with a try square and marking knife, 30 mm from the end, which will be the tenon length, as it must be shorter than the 44 mm leg.

I set a mortise gauge to the width of a 6 mm mortise chisel, which is about a third of the 20 mm rail thickness, and, working from the face side, I gauge the two cheek lines of the tenon round the end of the rail and the two sides of the mortise on the leg. I mark the ends of the mortise on the leg with a try square, a little shorter than the rail width so there are shoulders at the top and bottom.

To cut the tenon, I hold the rail at an angle in the vice and saw down the cheeks with a tenon saw on the waste side of the lines, then cut the shoulders on a bench hook. I cut the top and bottom shoulders in the same way.

To cut the mortise, I clamp the leg firmly to the bench and chop with the 6 mm mortise chisel and a mallet, starting in the middle and working out towards the ends, keeping the chisel upright. A strip of tape on the chisel marks the 32 mm depth. I lever out the waste and finish the ends exactly on the lines.

I test the fit and pare the tenon with a bevel-edged chisel if it is too tight. Finally I glue the joint with PVA, clamp it with a sash cramp and check it is square with a try square.

Explanation

Top-level answers mark out from the face side and face edge, set the mortise gauge to the chisel width, name the tools for each stage (try square, marking knife, mortise gauge, tenon saw, bench hook, mortise chisel, mallet, sash cramp) and cut in a sensible order. Answers that list tools without the stages, or confuse the mortise with the tenon, stay in the lower levels.

Mark scheme
  1. 6 marks

    Levels of response (6 marks).
    Level 3 (5-6 marks): A detailed description making several correct points for the selected process. Specific correct and appropriate process stages and specific equipment given, in a logical sequence.
    Level 2 (3-4 marks): A description with points showing some understanding of the selected process. Basic reference made to some stages of the process with some equipment given.
    Level 1 (1-2 marks): Simple notes showing limited understanding of the selected process.
    0 marks: No response or nothing worthy of credit.

    Indicative content (illustrative, not exhaustive; credit any worthy points made in support of the band descriptors): MARKING OUT: mark face side and face edge on both pieces with a pencil; mark the shoulder line round the rail with a try square and marking knife; mark the tenon length (less than 44 mm, e.g. 30-35 mm, because it is stopped) with a marking gauge; set a mortise gauge to the width of the mortise chisel (about one third of the rail thickness, e.g. 6 mm for 20 mm) and gauge the tenon cheeks on the rail and the mortise on the leg from the face side; mark the mortise length on the leg with a try square (less than the rail width, allowing for haunches or shoulders); hatch or mark the waste. CUTTING THE TENON: hold the rail in a bench vice at an angle; rip down the cheeks with a tenon saw on the waste side of the lines; cut the shoulders with the tenon saw against a bench hook; trim with a chisel if needed. CUTTING THE MORTISE: clamp the leg to the bench over a solid part or hold in a vice; chop with a mortise chisel and mallet, starting in the middle and working towards the ends, chisel kept upright, bevel facing the waste; mark the depth on the chisel with tape or check with a depth gauge; lever out waste; chop the ends to the lines last; (optionally drill out most of the waste first with a pillar drill and Forstner bit). FITTING: test fit, pare the tenon with a bevel-edged chisel if tight; check square with a try square; glue with PVA and clamp with sash cramps, checking diagonals; wipe off excess glue. SAFETY: work held securely, hands behind the cutting edge, sharp tools. Accept all other valid responses.

Ready to try the rest? Every answer you write is marked against the mark scheme, so you can see exactly where the marks are.

Study Helper Hints first, answers after you try

Stuck on this one? Ask for a hint and I’ll point you in the right direction, without giving the answer away. Once you’ve checked your answer, I’ll show you how the marks are awarded.