Practise 15 exam-style questions on Shaping by forming and manipulation for AQA GCSE Engineering. Write your answer as you would in the exam and get it marked in seconds against the mark scheme, point by point, with the Study Helper on hand if you get stuck.
15 questions
1–8 marks each
Instant marking
No sign-up needed
15 questions, marked as you go
Sample questions with model answers
Here are 4 of the questions in this topic, each with a model answer, an explanation of why it earns the marks and the mark scheme an examiner would use.
Question 1
1 mark
In composite lay-up, why is a release agent (such as wax) applied to the mould before any resin or fibres?
Choose your answer.
A To bond the fibres to the resin
B To stop the cured part sticking to the mould
C To speed up the curing of the resin
D To give the finished part its colour
Model answer
B To stop the cured part sticking to the mould
Explanation
Cured resin is a strong adhesive, so without a release agent the part would bond to the mould and both could be damaged when it is removed. The resin itself bonds the fibres (A), the hardener or catalyst controls the curing (C), and a coloured gel coat gives the outer surface its colour and finish (D).
Mark scheme
1 mark
B / To stop the cured part sticking to the mould
Accept the letter or the option text. If more than one option is given, 0 marks.
Question 2
2 marks
A steel strip is bent to exactly 90° in a press. When it is released, the angle opens out slightly to about 87°.
Explain why this happens and how it can be allowed for.
Model answer
Some of the bending is elastic, so when the press releases the strip the metal springs back a little towards its original flat shape. This is allowed for by overbending: the strip is bent to about 93°, so that it springs back to 90°.
Explanation
Bending deforms the metal plastically (permanently) and elastically (temporarily). The elastic part recovers when the load is removed, which is called springback. Press tools and folders are therefore set to overbend by a few degrees. The two marks are independent: one for the cause and one for the remedy.
Mark scheme
1 mark
Why: part of the bending is elastic deformation, so when the force is removed the metal partly springs back towards its original shape (springback)
Accept 'the metal is elastic and springs back' or 'not all of the bend is permanent (plastic)'. Do not accept 'the metal is too hard' or 'the press was set wrongly'.
1 mark
Allowed for by overbending: bending slightly past 90° (to about 93°), so that it springs back to 90°
Accept 'bend it further than needed' or 'use a die with a sharper angle'. Accept annealing the strip first to reduce springback.
Question 3
3 marks
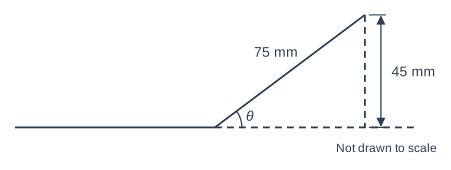
A sheet metal bracket is bent so that its sloping leg is 75 mm long and its end is 45 mm higher than the base, as shown in Figure 1.
Calculate the bend angle θ. Give your answer to 1 decimal place.
Model answer
The sloping leg is the hypotenuse (75 mm) and the rise is opposite θ (45 mm). sin θ = 45 ÷ 75 = 0.6 θ = sin⁻¹(0.6) = 36.9°
Explanation
Label the right-angled triangle: the 75 mm leg is the hypotenuse and the 45 mm rise is opposite the angle, so use sine. The horizontal side is 60 mm (a 3-4-5 triangle), so tan θ = 45 ÷ 60 also works. A common error is using tan with the 75 mm hypotenuse, which gives 31.0°.
Mark scheme
1 mark
Uses sine (opposite and hypotenuse); or a correct final answer of 36.9° with no working
An answer of 36.9° (or 36.87°) with no working scores 3 marks. Also accept a correct alternative method, e.g. Pythagoras to find the horizontal distance (60 mm) and then tan θ = 45 ÷ 60 or cos θ = 60 ÷ 75.
1 mark
sin θ = 45 ÷ 75 (= 0.6) / θ = sin⁻¹(45 ÷ 75)
For the alternative method, tan θ = 45 ÷ 60 or cos θ = 60 ÷ 75 (after finding 60 mm by Pythagoras) scores this mark. tan θ = 45 ÷ 75 (31.0°) does not score this mark.
1 mark
θ = 36.9°
Accept 36.9° or 36.87°; 36.8° (incorrect rounding) does not score this mark. 53.1° (the angle between the leg and the vertical, e.g. from cos⁻¹(45 ÷ 75)) does not score this mark. 31.0° (tan used with the hypotenuse) scores 0.
Question 4
6 marks
Use notes to explain how a glass-reinforced plastic (GRP) kayak seat is made by hand lay-up in an open mould.
Model answer
1. Clean the mould and polish on several coats of release wax so that the finished seat will come out without sticking. 2. Brush a layer of coloured gel coat onto the mould and leave it until it is tacky. This gives the seat a smooth, coloured, waterproof surface. 3. Cut pieces of glass fibre mat slightly larger than the mould. 4. Wearing nitrile gloves, goggles and an apron, mix polyester resin with the correct small amount of hardener in a ventilated room, because the fumes are harmful. 5. Brush resin onto the gel coat, lay a piece of mat on top, then stipple it with the brush and roll it with a ribbed roller until the mat is fully wetted and all air bubbles are pushed out. 6. Add more layers of resin and mat in the same way until the seat is thick enough, for example three layers. 7. Leave the seat to cure until the resin is hard. 8. Ease the seat out of the mould, trim the rough edges with a hacksaw while wearing a dust mask, and sand the edges smooth.
Explanation
Top-level answers give the stages in order (release agent, gel coat, resin and mat layers rolled to remove air, cure, demould, trim) with detail of the tools and materials, and the safety precautions for resin fumes, skin contact and glass fibre dust. A common error is to mix this up with vacuum forming or injection moulding. A bare list of stages is capped at 2 marks.
Mark scheme
6 marks
Levels of response (6 marks). Level 3 (5-6 marks): Detailed explanation including all key stages to make the seat by hand lay-up, with the equipment/tools used and safety. Notes are clear and in a logical order. Level 2 (3-4 marks): Some stages described in detail OR the majority of stages covered but with insufficient detail to allow correct manufacture. Level 1 (1-2 marks): One or more basic steps/stages listed. 0 marks: No response or nothing worthy of credit.
Max 2 if the stages are only listed with no detail. Indicative content, key stages in order (accept all other valid responses): 1. Prepare the mould: clean it and apply a release agent (wax or PVA) so the part does not stick. 2. Brush or spray a gel coat (coloured resin) onto the mould and let it become tacky; this forms the smooth outer surface. 3. Cut the glass fibre mat or woven cloth to shape, slightly oversize. 4. Mix the polyester or epoxy resin with the correct amount of hardener (catalyst). 5. Brush resin onto the gel coat, lay the first layer of mat on it and stipple or roll it with a brush or ribbed roller to wet it out and remove air bubbles. 6. Repeat with further layers until the required thickness is reached. 7. Leave the resin to cure (harden), optionally under a vacuum bag. 8. Remove (demould) the seat and trim the rough edges with a saw or grinder, then finish the edges. Safety: wear nitrile gloves, goggles and overalls; work in a well-ventilated area or wear a respirator (styrene fumes); wear a dust mask when trimming glass fibre; follow the hardener ratio carefully because the reaction gives out heat.
Ready to try the rest? Every answer you write is marked against the mark scheme, so you can see exactly where the marks are.
Ctrl + Enter to check
Study HelperHints first, answers after you try
Stuck on this one? Ask for a hint and I’ll point you in the right direction, without giving the answer away. Once you’ve checked your answer, I’ll show you how the marks are awarded.