
Level:
Correct: 0
Incorrect: 0
Marks: 0/0
Exam Practice
Course:
Topics:
AQA GCSE Engineering Smart practice A mixed round aimed at your weak spots
Unit 1
Engineering materials
Unit 2
Engineering manufacturing processes
Additive manufacturing
Material removal
Material removal
Casting and moulding
Joining and assembly
Heat and chemical treatment
Surface finishing
Surface finishing
Unit 3
Systems
Unit 4
Testing and investigation
Unit 5
The impact of modern technologies
Unit 6
Practical engineering skills
Avg
score:
–
Topics
done:
0/32

Materials testing

Practise 16 exam-style questions on Materials testing for AQA GCSE Engineering. Write your answer as you would in the exam and get it marked in seconds against the mark scheme, point by point, with the Study Helper on hand if you get stuck.

  • 16 questions
  • 1–8 marks each
  • Instant marking
  • No sign-up needed
16 questions, marked as you go

Sample questions with model answers

Here are 4 of the questions in this topic, each with a model answer, an explanation of why it earns the marks and the mark scheme an examiner would use.

Question 1

1 mark

The welds on a steel pressure vessel must be checked for cracks hidden inside the weld metal, without damaging the vessel.

Name one test that could be used.

Model answer

Ultrasonic testing.

Explanation

Cracks inside a weld cannot be seen, so a test that looks into the metal is needed: X-rays show flaws as darker areas on the image, and ultrasonic waves are reflected back from them. Dye penetrant and magnetic particle tests only show cracks at or very near the surface.

Mark scheme
  1. 1 mark

    X-ray testing (radiography) / ultrasonic testing

    Accept gamma-ray radiography. Do not accept dye penetrant or magnetic particle testing (these find cracks at or just below the surface, not deep inside the weld), visual inspection, or destructive tests such as tensile, bend or impact tests.
Question 2

2 marks

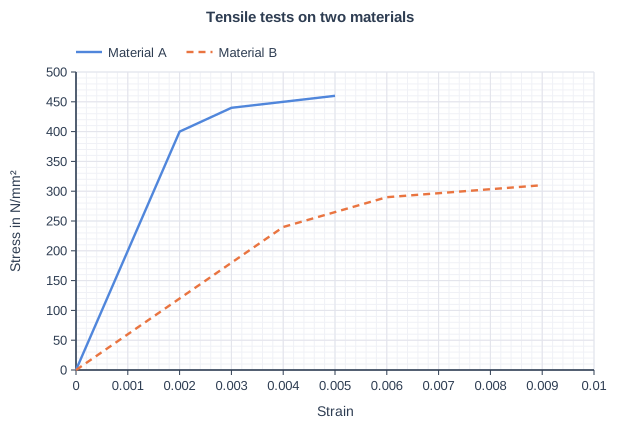
Figure 1 shows stress/strain graphs from tensile tests on two materials, A and B.

State which material is stiffer. Give a reason for your answer using the graph.

Tensile tests on two materials. Line graph of Stress in N/mm² (y-axis, 0 to 500) against strain (x-axis, 0 to 0.01). "Material A" joins the points (0, 0), (0.002, 400), (0.003, 440), (0.005, 460). "Material B" (dashed) joins the points (0, 0), (0.004, 240), (0.006, 290), (0.009, 310).

Model answer

Material A is stiffer. The straight-line part of its graph is steeper: A reaches 400 N/mm² at a strain of 0.002, but B only reaches 240 N/mm² at twice that strain (0.004), so A has the higher Young's modulus.

Explanation

Stiffness is resistance to stretching or bending, measured by Young's modulus, which is the gradient of the straight-line part of a stress/strain graph. A steeper gradient means less strain for each N/mm² of stress. Saying that A is stronger, or that B stretches further before breaking, does not answer the question about stiffness.

Mark scheme
  1. 1 mark

    Material A

    No reason is needed for this mark.

  2. 1 mark

    its straight-line (elastic) part is steeper / it has less strain for the same stress / it has a higher Young's modulus (A: 400 ÷ 0.002 = 200 000 N/mm²; B: 240 ÷ 0.004 = 60 000 N/mm²)

    Do not accept 'A is stronger' or 'A reaches a higher stress' on their own: stiffness is shown by the gradient of the elastic part, not the height of the graph. Do not accept 'B stretches more before it breaks' (that describes ductility); accept 'B has more strain for the same stress'.

Question 3

3 marks

Use the word bank to complete the statements about a tensile test.

In a tensile test, the specimen is held in the jaws of a testing machine and is ........(a)........ until it breaks.

Up to the elastic limit, the specimen returns to its ........(b)........ length when the load is removed.

The greatest stress the specimen can withstand before it breaks is called its ultimate ........(c)........ strength.

Word bank

compressed   final   hardness   original   shear   stretched   tensile   twisted

Write the missing word for each of (a), (b) and (c).

Model answer

(a) stretched
(b) original
(c) tensile

Explanation

A tensile test stretches (pulls) a specimen until it breaks, recording load and extension. Within the elastic region the specimen springs back to its original length; the greatest stress reached is the ultimate tensile strength (maximum load ÷ original cross-sectional area). Compressed and shear describe other types of loading.

Mark scheme
  1. 1 mark

    (a) stretched

    Accept 'pulled', which means the same. Do not accept compressed or twisted.

  2. 1 mark

    (b) original

    Do not accept final.

  3. 1 mark

    (c) tensile

    Do not accept shear or hardness.

Question 4

6 marks

A company needs to find the tensile strength of a new aluminium alloy.

Describe, in stages, how a tensile test is carried out on a specimen of the alloy and how the results are used to find its tensile strength.

Model answer

1. Machine a standard 'dog-bone' specimen from the alloy so that it will break in the middle, not in the grips.
2. Measure the diameter of the middle section with a micrometer, work out the original cross-sectional area (πr²) and mark the gauge length on the specimen.
3. Clamp each end securely in the grips of a tensile testing machine and attach an extensometer to measure the extension.
4. Close the safety guard and wear safety glasses, because the specimen can snap suddenly and throw out pieces.
5. Apply a slowly increasing pulling load. Record the load and extension at regular intervals (or let the machine's computer record them).
6. Keep loading until the specimen necks and breaks, and note the maximum load reached. Remove the broken pieces carefully.
7. Plot a load/extension graph and read off the maximum load.
8. Calculate the ultimate tensile strength = maximum load ÷ original cross-sectional area, in N/mm².
9. Repeat with at least three specimens and calculate a mean so the result is reliable.

Explanation

A top answer follows the test in order: preparing and measuring the specimen, clamping it in the machine, safety precautions, loading steadily while recording load and extension, loading to fracture, and finally calculating tensile strength from the maximum load and original area. Each stage needs detail (what is measured, with what, and why). Answers that say only 'pull it until it breaks and measure it' stay in Level 1.

Mark scheme
  1. 6 marks

    Levels of response (6 marks).
    Level 3 (5-6 marks): Detailed explanation including all key stages to carry out the tensile test and find the tensile strength, with the equipment used and safety. Notes are clear and in a logical order.
    Level 2 (3-4 marks): Some stages described in detail OR the majority of stages covered but with insufficient detail to allow the test to be carried out correctly.
    Level 1 (1-2 marks): One or more basic steps/stages listed.
    0 marks: No response or nothing worthy of credit.

    Max 2 if the stages are only listed with no detail. Indicative content (key stages in order; accept all other valid responses): machine a standard specimen (e.g. a 'dog-bone' shape) from the alloy; measure its original cross-sectional area (diameter or width and thickness with a micrometer or Vernier calipers) and mark the gauge length; clamp the ends securely in the jaws/grips of a tensile testing machine and attach an extensometer; close the safety guard and wear safety glasses, as the specimen can snap and throw out pieces; apply a slowly and steadily increasing tensile (pulling) load; record the load and extension at regular intervals (or the machine's computer plots the graph); continue until the specimen necks and fractures; record the maximum load; remove the broken pieces carefully; plot a load/extension graph and find the maximum load; ultimate tensile strength = maximum load ÷ original cross-sectional area (N/mm²); repeat with several specimens and take a mean for reliable results.

Ready to try the rest? Every answer you write is marked against the mark scheme, so you can see exactly where the marks are.

Study Helper Hints first, answers after you try

Stuck on this one? Ask for a hint and I’ll point you in the right direction, without giving the answer away. Once you’ve checked your answer, I’ll show you how the marks are awarded.