
Level:
Correct: 0
Incorrect: 0
Marks: 0/0
Exam Practice
Course:
Topics:
AQA GCSE Engineering Smart practice A mixed round aimed at your weak spots
Unit 1
Engineering materials
Unit 2
Engineering manufacturing processes
Additive manufacturing
Material removal
Material removal
Casting and moulding
Joining and assembly
Heat and chemical treatment
Surface finishing
Surface finishing
Unit 3
Systems
Unit 4
Testing and investigation
Unit 5
The impact of modern technologies
Unit 6
Practical engineering skills
Avg
score:
–
Topics
done:
0/32

Joining and assembly

Practise 14 exam-style questions on Joining and assembly for AQA GCSE Engineering. Write your answer as you would in the exam and get it marked in seconds against the mark scheme, point by point, with the Study Helper on hand if you get stuck.

  • 14 questions
  • 1–8 marks each
  • Instant marking
  • No sign-up needed
14 questions, marked as you go

Sample questions with model answers

Here are 4 of the questions in this topic, each with a model answer, an explanation of why it earns the marks and the mark scheme an examiner would use.

Question 1

1 mark

A threaded fastening is screwed into a plain pilot hole in a thin steel sheet. It cuts its own thread as it goes in, so no nut is needed.

Which one of the following is it?

Choose your answer.

  • A Coach bolt
  • B Machine screw
  • C Self-tapping screw
  • D Stud

Model answer

C Self-tapping screw

Explanation

A self-tapping screw has a hardened, sharp thread that cuts (or forms) its own thread in a plain pilot hole in sheet metal or plastic. A machine screw needs a tapped (threaded) hole or a nut, a stud is a rod threaded at both ends, and a coach bolt is used with a nut, mainly in timber.

Mark scheme
  1. 1 mark

    C / Self-tapping screw

    Accept the letter or the option text. If more than one option is given, 0 marks.
Question 2

2 marks

Give two safety precautions that must be taken when MIG welding.

Model answer

1. Wear a welding helmet with the correct dark filter to protect the eyes and face from the bright UV light of the arc.
2. Use fume extraction or work in a well-ventilated area so the welding fumes are not breathed in.

Explanation

MIG welding produces intense ultraviolet light, hot spatter, fumes and a fire risk, so each precaution should deal with one of these hazards. Ordinary safety goggles are not enough: only a welding filter protects against arc eye. 'Wear PPE' on its own does not score because no item is named.

Mark scheme
  1. 2 marks

    Any two different precautions: wear a welding helmet/mask with the correct dark filter (or auto-darkening) / wear leather gauntlets (welding gloves) / wear a leather apron or flame-resistant clothing that covers the skin / use fume extraction or good ventilation / put up welding screens to protect other people from the arc / remove flammable materials from the area or have a fire extinguisher ready / keep the gas cylinder secured upright and check the hoses / attach the earth clamp properly / handle hot work with tongs or pliers

    1 mark for each different correct precaution, max 2. Do not accept ordinary safety goggles or safety glasses (they do not protect the eyes from the arc) or 'wear PPE' with no item named. Two items of the same kind (e.g. gloves and gauntlets) score once.

Question 3

3 marks

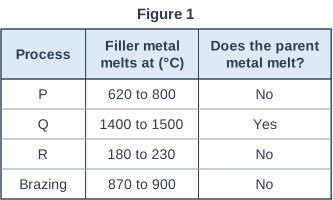
Figure 1 gives information about three joining processes, P, Q and R, and about brazing.

Name the processes P, Q and R.

Figure 1. Table with columns "Process", "Filler metal melts at (°C)", "Does the parent metal melt?". Process: P; Filler metal melts at (°C): 620 to 800; Does the parent metal melt?: No | Process: Q; Filler metal melts at (°C): 1400 to 1500; Does the parent metal melt?: Yes | Process: R; Filler metal melts at (°C): 180 to 230; Does the parent metal melt?: No | Process: Brazing; Filler metal melts at (°C): 870 to 900; Does the parent metal melt?: No.

Model answer

P is hard (silver) soldering.
Q is welding.
R is soft soldering.

Explanation

The working temperatures go soft soldering < hard soldering < brazing < welding. Only welding melts the parent metal (about 1400-1500 °C for steel), so Q is welding. R has the lowest temperature, so it is soft soldering, and P sits just below brazing, so it is hard (silver) soldering. A common error is to swap P and R, or to call P brazing when brazing is already given in the table.

Mark scheme
  1. 1 mark

    P: hard soldering / silver soldering

    Accept silver brazing. Do not accept soldering on its own or soft soldering.

  2. 1 mark

    Q: welding

    Accept fusion welding or any named fusion welding process, e.g. MIG, TIG, arc or oxy-acetylene welding. The parent metal melting is the key clue.

  3. 1 mark

    R: soft soldering

    Accept soldering for R. Do not accept hard soldering.

Question 4

6 marks

Describe, in stages, how two pieces of mild steel can be joined by brazing in a school workshop.

Include the equipment used and any safety precautions.

Model answer

1. Clean the surfaces to be joined to bright metal with a file and emery cloth, then wipe off any grease, because brazing will not take on dirty or rusty steel.
2. Check that the pieces fit closely together with only a small gap, so the molten brass can be drawn into it.
3. Mix flux (borax) into a paste and apply it to the joint area. The flux stops oxides forming when the steel is heated.
4. Place the pieces on fire bricks in the brazing hearth and hold them in position with a clamp or binding wire so they cannot move.
5. Put on a leather apron, gloves and a face shield. Light the gas-air torch with the air turned low, then adjust it to a hot blue flame. Heat the whole joint evenly until it glows bright red (about 850-900 °C).
6. Touch the end of the brass brazing rod onto the joint. The rod melts and flows into the gap by capillary action. The steel parts do not melt.
7. Turn off the torch and leave the work on the bricks to cool, moving it only with tongs. Put up a 'hot work' warning.
8. When it is cold, remove the hard flux residue with a file or wire brush and clean up the joint.

Explanation

A top answer gives the stages in order (clean, flux, support, heat, apply filler, cool, clean up) with detail about each, names the equipment (brazing hearth, fire bricks, gas torch, brass rod, tongs) and includes safety. The key brazing facts are that flux is needed and that the brass filler melts and flows into the joint while the steel stays solid. A simple list of steps with no detail is capped at 2 marks.

Mark scheme
  1. 6 marks

    Levels of response (6 marks).
    Level 3 (5-6 marks): Detailed explanation including all key stages to join the two pieces by brazing, with the equipment/tools used and safety. Notes are clear and in a logical order.
    Level 2 (3-4 marks): Some stages described in detail OR the majority of stages covered but with insufficient detail to allow a correct brazed joint to be made.
    Level 1 (1-2 marks): One or more basic steps/stages listed.
    0 marks: No response or nothing worthy of credit.

    Max 2 if the stages are only listed with no detail.
    Indicative content (in order; accept all other valid responses):
    - Clean the joint surfaces to bright metal with a file, emery cloth or wire brush and degrease them.
    - Make sure the parts fit closely (a small, even gap so the filler can flow in).
    - Apply flux (e.g. borax paste) to the joint to stop oxides forming.
    - Support the parts on fire bricks in the brazing hearth and hold them in position with clamps, wire or a jig.
    - Light the gas-air brazing torch correctly and heat the whole joint evenly to bright red heat (about 850-900 °C).
    - Touch the brazing rod (brass spelter) onto the hot joint: it melts and flows into the gap by capillary action. The steel itself does not melt.
    - Remove the heat and leave the work to cool on the hearth, moving it only with tongs.
    - Clean off the flux residue (file, wire brush or pickle) and finish the joint.
    Safety: leather apron and gloves, face shield or goggles, tongs, good ventilation for flux fumes, hair tied back, turn the gas off after use, warn others that the work is hot.

Ready to try the rest? Every answer you write is marked against the mark scheme, so you can see exactly where the marks are.

Study Helper Hints first, answers after you try

Stuck on this one? Ask for a hint and I’ll point you in the right direction, without giving the answer away. Once you’ve checked your answer, I’ll show you how the marks are awarded.