Level:
Correct: 0
Incorrect: 0
Marks: 0/0
Exam Practice
Subject:
Topics:
Avg
score:
–
Topics
done:
0/21

Fieldwork: presenting data

Practise 32 exam-style questions on Fieldwork: presenting data for AQA GCSE Geography (Paper 3). Write your answer as you would in the exam and get it marked in seconds against the mark scheme, point by point, with an AI tutor on hand if you get stuck.

  • 32 questions
  • 1–12 marks each
  • Instant marking
  • No sign-up needed
20 questions, marked as you go

Sample questions with model answers

Here are 4 of the questions in this topic, each with a model answer, an explanation of why it earns the marks and the mark scheme an examiner would use.

Question 1

1 mark

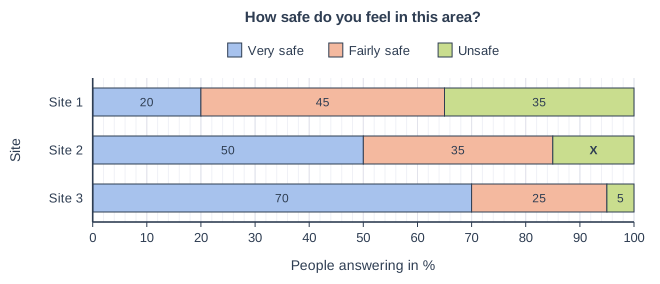
Students asked 20 people at each of three sites in a town 'How safe do you feel in this area?'. Figure 1 shows the results as a divided bar chart.

Calculate the percentage of people at Site 2 who answered 'Unsafe' (shown by X).

How safe do you feel in this area?. Stacked bar chart with 3 horizontal bars. The value axis (x-axis) is "People answering in %", from 0 to 100 marked every 10; the bars are labelled along the y-axis, "Site", from top to bottom. Each bar is split into 3 parts, shown in the key: Very safe (left, blue), Fairly safe (middle, orange) and Unsafe (right, green). Values: Site 1: very safe 20%, fairly safe 45%, unsafe 35%; Site 2: very safe 50%, fairly safe 35%, unsafe marked X; Site 3: very safe 70%, fairly safe 25%, unsafe 5%. The value of each part is printed on it.

Model answer

100 − 50 − 35 = 15%.

Explanation

Each divided bar shows 100% of the people asked at that site, so the missing part is 100 minus the other parts. Divided bar charts make it easy to compare the proportions at several sites side by side.

Mark scheme
  1. 1 mark

    15%

    100 − 50 − 35 = 15; correct answer with no working scores full marks

Question 2

2 marks

Give two features that should be included on a field sketch to make it useful for presenting fieldwork observations.

Model answer

A field sketch should have a title saying where it was drawn and what it shows, and annotations that explain the main features, such as 'meander with river cliff on the outside of the bend'.

Explanation

A field sketch is a simple, labelled drawing that picks out the geography that matters to the enquiry. Annotations (explanatory notes) are more useful than one-word labels, and a title, direction and location let someone else know exactly what the sketch shows.

Mark scheme
  1. 1 mark

    A title saying what and where the sketch shows

    max 2; 1 mark per feature

  2. 1 mark

    Labels or annotations that name and explain the key features (e.g. 'steep valley side, V-shaped')

  3. 1 mark

    The direction the sketch is facing (e.g. 'looking north-east') / a compass arrow

  4. 1 mark

    The location, e.g. a grid reference or site name

  5. 1 mark

    The date and time it was drawn

  6. 1 mark

    A frame with simple outlines of the main features (skyline, river, buildings, land use) rather than artistic detail

  7. 1 mark

    An indication of scale or distance (e.g. 'the bridge is about 50 m away')

Question 3

4 marks

Students counted the vehicles entering Hexley town centre on four roads between 8 am and 9 am. Figure 1 shows their results as a flow line map; flow lines A to D are drawn beside the roads.

Use Figure 1 to describe the pattern of traffic entering the town.

Traffic entering Hexley, 8-9 am. Map of a local area, 6 km from west to east and 4 km from south to north, with north at the top. Areas: the town centre shown pink, in the centre of the map. Lines: the A61 (main road) runs from the west edge to the centre of the map, passing through the west of the map; the A631 (main road) runs from the centre of the map to the east edge, passing through the east of the map; a secondary road runs from the centre of the map to the north edge, passing through the north of the map; a minor road runs from the centre of the map to the south edge, passing through the south of the map. Flow lines (blue arrows) show vehicles per hour: the width of each is proportional to the value (key widths: 200 and 800). Flows: flow A from the west of the map to the centre of the map: wider than the 800 key line; flow B from the east of the map to the centre of the map: between the 200 and 800 key widths; flow C from the north of the map to the centre of the map: between the 200 and 800 key widths; flow D from the south of the map to the centre of the map: narrower than the 200 key line. Letters in circles: A labels a flow line that runs from the west of the map to the centre of the map; B labels a flow line that runs from the east of the map to the centre of the map; C labels a flow line that runs from the north of the map to the centre of the map; D labels a flow line that runs from the south of the map to the centre of the map. The key (beside the map) shows: [Vehicles per hour], 200, 800, town centre, main road, secondary road, minor road. Below the map: a scale bar marked 0, 1 and 2 km and a north arrow pointing to the top.

Model answer

Most traffic enters Hexley along the main west-east route. The busiest road is the A61 from the west (A), with about 950 vehicles per hour, followed by the A631 from the east (B) with about 600. Much less traffic comes from the north on the secondary road (C), about 300 vehicles, and the least comes from the south on the minor road (D), under 100 vehicles per hour, about a tenth of the flow on the A61.

Explanation

On a flow line map the width of each arrow is proportional to the amount of movement, so the widest arrow is the busiest route. Good descriptions rank the routes, give approximate values from the key and make an overall statement about the pattern.

Mark scheme
  1. 1 mark

    The busiest road is the A61 from the west (A), with about 900-1000 vehicles per hour

    max 4; 1 mark per valid point; values estimated from the key within about 100 vehicles are acceptable (actual: A 950, B 620, C 280, D 90); max 3 if no values are used

  2. 1 mark

    The A631 from the east (B) is the second busiest, with about 600 vehicles per hour

  3. 1 mark

    The two main (A) roads carry far more traffic than the roads from the north (C, about 280) and south (D, under 100)

  4. 1 mark

    The least traffic comes from the south (D), only about 90 vehicles per hour, roughly a tenth of the flow on the A61

  5. 1 mark

    Most traffic (about four-fifths of the total of about 1900) enters along the west-east route

  6. 1 mark

    All four flows are towards the town centre

    credit once

Question 4

6 marks

Students asked 47 shoppers at Ambleton market where they had travelled from, to find the market's sphere of influence. Figure 1 shows their results as a desire line map, with the width of each line showing the number of shoppers.

Evaluate the desire line map as a way of presenting these results.

Where shoppers at Ambleton market came from. Map of a local area, 12 km from west to east and 10 km from south to north, with north at the top. Areas: the town centre shown pink, in the centre of the map. Lines: the A614 (main road) runs from the west edge to the east edge, passing through the centre of the map; the B1220 (secondary road) runs from the centre of the map to the north edge, passing through the north of the map. Desire lines: straight lines join "Market" (a star in the centre of the map (inside the town centre; on the A614 (main road); on the B1220 (secondary road))) to 7 places; line width shows how many people came from each place (key: 1 person, 6 people and 12 people). Origins: "Ashby" in the north-west of the map (a line between the key's 1 and 6 people widths); "Thorpe" in the north-east of the map (a line between the key's 6 and 12 people widths); "Kirkham" in the south-east of the map (a line between the key's 1 and 6 people widths); "Holme" in the south-west of the map (a line as wide as the key's 6 people line); "Ryton" in the north of the map (a line between the key's 1 and 6 people widths); "Elmdon" in the centre of the map (a line as wide as the key's 12 people line); "Westfield" in the centre of the map (a line between the key's 6 and 12 people widths). The key (beside the map) shows: [Desire line], 1 person, 6 people, 12 people, survey point, town centre, main road, secondary road. Below the map: a scale bar marked 0, 2.5 and 5 km and a north arrow pointing to the top.

Model answer

The desire line map is an effective way to show the market's sphere of influence because it shows both where shoppers came from and how far they travelled. The furthest origin is Thorpe, about 5 km to the north-east, so the sphere of influence can be estimated. Making the line widths proportional to the number of shoppers means the most important origins stand out: Elmdon, with 12 shoppers, and Thorpe, with 9, show that almost half the shoppers came from the north-east. The base map also helps explain this, as both villages lie along the A614.

However, the lines are straight, so they do not show the real routes people took along roads. The lines also crowd together near the market, and with more origins they would overlap and become difficult to read. Grouping shoppers by village hides exactly where they live, and the map says nothing about how they travelled or how often they visit. The map is based on only 47 people on one day, so the sphere of influence it shows may not be typical.

Overall, the desire line map is a good choice for showing direction, distance and the number of people from each place, but it would be more useful with a table of distances and a larger sample.

Explanation

A desire line map is the standard technique for showing spheres of influence, so the best answers explain why it suits the data and use the figure (origins, distances and numbers) before weighing its limitations. A conclusion should make a clear judgement rather than just repeating the points.

Mark scheme
  1. 6 marks

    Levels of response (6 marks).
    Level 3 (5-6 marks): Detailed evaluation of strengths and limitations of the desire line map, making effective use of evidence from Figure 1; reaches a clear, justified conclusion.
    Level 2 (3-4 marks): Clear evaluation, which may be unbalanced; some use of Figure 1; limited conclusion.
    Level 1 (1-2 marks): Basic statements about desire lines; little or no use of Figure 1; no conclusion.
    0 marks: nothing worthy of credit.

    Indicative content (not a checklist; credit other valid points): Strengths: shows both the direction and distance of each origin, so the sphere of influence can be seen - shoppers came from up to about 5.4 km away (Thorpe); line widths show the number of shoppers, so the main origins stand out - most came from the north-east (Elmdon 12 and Thorpe 9, 21 of 47); distances can be measured with the scale and a mean distance worked out (about 4 km); roads on the base map help explain the pattern, e.g. the busiest origins lie along the A614. Limitations: straight lines do not show the actual routes people travelled along roads; lines crowd together near the market and can overlap, which would get worse with more origins; grouping shoppers by settlement hides exactly where each person lives; does not show how people travelled or how often they visit; based on only 47 people on one day, so the sphere of influence may not be reliable; lines going off the map would need a different scale. Conclusion, e.g. an effective way to show the sphere of influence, especially with proportional widths, but best combined with a table of distances or a map of transport routes.

Ready to try the rest? Every answer you write is marked against the mark scheme, so you can see exactly where the marks are.

AI Tutor Hints first, answers after you try

Hi! Stuck? Ask me for a hint and I’ll help you work it out. Once you’ve checked your answer I can explain exactly where the marks are.