
Level:
Correct: 0
Incorrect: 0
Marks: 0/0
Exam Practice
Course:
Topics:
Edexcel GCSE Physics (Paper 1) Smart practice A mixed round aimed at your weak spots
Unit 1
Key concepts of physics
Unit 2
Motion and forces
Unit 3
Conservation of energy
Unit 4
Waves
Unit 5
Light and the electromagnetic spectrum
Unit 6
Radioactivity
Unit 7
Astronomy
Avg
score:
–
Topics
done:
0/40

Lenses, ray diagrams and images

Practise 15 exam-style questions on Lenses, ray diagrams and images for Edexcel GCSE Physics (Paper 1). Write your answer as you would in the exam and get it marked in seconds against the mark scheme, point by point, with the Study Helper on hand if you get stuck.

  • 15 questions
  • 1–6 marks each
  • Instant marking
  • No sign-up needed
15 questions, marked as you go

Sample questions with model answers

Here are 4 of the questions in this topic, each with a model answer, an explanation of why it earns the marks and the mark scheme an examiner would use.

Question 1

1 mark

A ray of light passes through the principal focus, F, of a converging lens and then reaches the lens.

State the direction of the ray after it has passed through the lens.

Model answer

After the lens, the ray travels parallel to the principal axis.

Explanation

This is the reverse of the rule that rays parallel to the principal axis are refracted through F: light paths are reversible, so a ray that passes through F before the lens leaves it parallel to the axis. This rule gives the third ray used to locate an image in a ray diagram.

Mark scheme
  1. 1 mark

    parallel to the principal axis (1)

    accept parallel to the axis / parallel to the line through the centre of the lens; do not accept 'straight on' / 'not bent' / 'through F on the other side'; ignore 'it is refracted' on its own.
Question 2

2 marks

A camera uses a converging lens to form a sharp, real image on its sensor. The camera focuses by moving the lens towards or away from the sensor.

Isla takes a photograph of a distant hill. She then takes a photograph of a flower close to the camera.

Explain how the position of the lens must change to give a sharp image of the flower.

Model answer

The lens must be moved further away from the sensor. The flower is much closer to the lens than the hill, and the closer an object is to a converging lens, the further behind the lens its image forms, so the sensor must be further from the lens for the image of the flower to be sharp.

Explanation

Light from a distant object arrives almost parallel and is focused at about F, but light from a nearby object is spreading out more when it reaches the lens, so the lens brings it together further away. Since the sensor cannot move, the camera moves the lens away from it. A common error is to move the lens towards the sensor.

Mark scheme
  1. 1 mark

    the lens must move further from the sensor (1)

    An explanation linking two points. accept the distance between the lens and the sensor must increase.

  2. 1 mark

    because the closer the object is to the lens, the further from the lens its image is formed (1)

    dependent on the first marking point. accept the rays from the flower are spreading out more when they reach the lens, so they meet further behind it / the image of the distant hill is at (about) F but the image of the flower is beyond F.

Question 3

3 marks

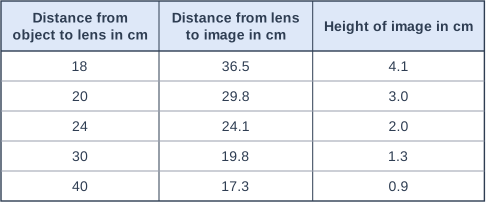
Amara investigates the images formed by a converging lens. She places an illuminated object, 2.0 cm tall, at different distances from the lens. Each time, she moves a screen until the image on it is sharp.

The table shows her results.

Use the results to determine the focal length of the lens. Explain how you used the results.

Table with columns "Distance from object to lens in cm", "Distance from lens to image in cm", "Height of image in cm". Distance from object to lens in cm: 18; Distance from lens to image in cm: 36.5; Height of image in cm: 4.1 | Distance from object to lens in cm: 20; Distance from lens to image in cm: 29.8; Height of image in cm: 3.0 | Distance from object to lens in cm: 24; Distance from lens to image in cm: 24.1; Height of image in cm: 2.0 | Distance from object to lens in cm: 30; Distance from lens to image in cm: 19.8; Height of image in cm: 1.3 | Distance from object to lens in cm: 40; Distance from lens to image in cm: 17.3; Height of image in cm: 0.9.

Model answer

When the object is 24 cm from the lens, the image is 24.1 cm from the lens and is 2.0 cm tall, the same size as the object. This only happens when the object is at 2F, twice the focal length from the lens, with the image at 2F on the other side.

So 2f = 24 cm, and the focal length f = 24 ÷ 2 = 12 cm.

Explanation

For a converging lens, an object at 2F gives a real, inverted image at 2F on the other side that is the same size as the object, so the row where the object and image distances are equal gives 2f. The other rows agree: objects between F and 2F give bigger images further away, and objects beyond 2F give smaller images closer to the lens. A common error is to give 24 cm as the focal length.

Mark scheme
  1. 1 mark

    the image distance equals the object distance / the image is the same size as the object when the object is (about) 24 cm from the lens (1)

    accept u = v at 24 cm / 24.1 cm. An answer of 12 cm with no working or explanation scores the third mark only.

  2. 1 mark

    this happens when the object is at 2F / twice the focal length from the lens (1)

    accept the object and the image are both at 2F.

  3. 1 mark

    focal length = 24 ÷ 2 = 12 cm (1)

    accept 12 to 12.1 cm. Alternative method (not required by the specification): award all 3 marks for correct use of 1/f = 1/u + 1/v with a row of the table, explained, giving 11.9 to 12.1 cm.

Question 4

4 marks

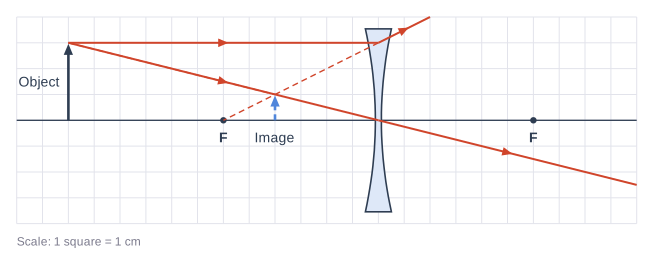
The figure shows a ray diagram for a diverging lens, drawn to scale on a grid (1 square = 1 cm). The object is 3.0 cm tall.

Use the figure to give the distance of the image from the lens and the height of the image.

Give two ways in which this image is different from the image of a distant object formed by the converging lens of a camera.

Ray diagram for a concave (diverging) lens, drawn to scale on a square grid (1 square = 1 cm). The lens is drawn as a lens shape that is thinner in the middle, standing on a horizontal line through its centre (the principal axis). Points marked F are on the axis 6 cm either side of the lens. The object is an upright arrow 3 cm tall standing on the axis 12 cm to the left of the lens, labelled "Object". 2 rays are drawn: one leaves the top of the object parallel to the axis and one goes from the top of the object straight through the centre of the lens. After the lens, the parallel ray bends away from the axis at the lens, as if it had come from the left-hand F (dashed line back to F) and the ray through the centre carries straight on. The rays spread apart after the lens; dashed lines extended back from them meet on the same side as the object, where a dashed, upright image arrow (labelled "Image") is drawn.

Model answer

The image is about 4 cm from the lens, on the same side as the object, and it is 1 cm tall. This image is upright, but the image formed by a camera's lens is inverted. This image is virtual, so it cannot be formed on a screen, but the camera's image is real and is formed on the sensor.

Explanation

The image of a diverging lens is where the rays, traced back (the dashed lines), appear to come from: here 4 cm from the lens and 1 cm tall. A diverging lens always forms a virtual, upright, diminished image on the same side as the object, while a camera's converging lens forms a real, inverted image on the far side. Both images are smaller than the object, so size is not a difference between them.

Mark scheme
  1. 1 mark

    (the image is) 4 cm from the lens (on the same side as the object) (1)

    Marking points 1 and 2 are for the readings; then any two from marking points 3, 4 and 5; max 2 for the differences, max 4 in total. Accept 3.5 to 4.5 cm. The side of the lens is not needed for this mark. Do not accept 12 cm (the object distance) or 6 cm (the focal length).

  2. 1 mark

    (the image is) 1 cm tall (1)

    Accept 0.9 to 1.1 cm / 1 square. Do not accept 3 cm (the object height).

  3. 1 mark

    this image is upright, but the camera's image is inverted / upside down (1)

    Both halves of the comparison are needed: 'it is upright' alone does not score.

  4. 1 mark

    this image is virtual / cannot be formed on a screen, but the camera's image is real / is formed on the sensor (1)

    Both halves of the comparison are needed: 'it is virtual' alone does not score.

  5. 1 mark

    this image is on the same side of the lens as the object, but the camera's image is on the opposite side of the lens (from the object) (1)

    Accept 'the rays only appear to come from this image, but in the camera the rays actually meet'. Ignore size: both images are smaller than the object, so size is not a difference.

Ready to try the rest? Every answer you write is marked against the mark scheme, so you can see exactly where the marks are.

Study Helper Hints first, answers after you try

Stuck on this one? Ask for a hint and I’ll point you in the right direction, without giving the answer away. Once you’ve checked your answer, I’ll show you how the marks are awarded.