Level:
Correct: 0
Incorrect: 0
Marks: 0/0
Exam Practice
Subject:
Topics:
AQA GCSE History (Elizabethan England) Smart practice A mixed round aimed at your weak spots
Unit 1
Part one: Elizabeth's court and Parliament
Unit 2
Part two: Life in Elizabethan times
Unit 3
Part three: Troubles at home and abroad
Unit 4
Part four: The historic environment of Elizabethan England
Avg
score:
–
Topics
done:
0/10

Historic environment: the Spanish Armada (2027 exams)

Practise 35 exam-style questions on Historic environment: the Spanish Armada (2027 exams) for AQA GCSE History (Elizabethan England). Write your answer as you would in the exam and get it marked in seconds against the mark scheme, point by point, with an AI tutor on hand if you get stuck.

  • 35 questions
  • 1–16 marks each
  • Instant marking
  • No sign-up needed
20 questions, marked as you go

Sample questions with model answers

Here are 4 of the questions in this topic, each with a model answer, an explanation of why it earns the marks and the mark scheme an examiner would use.

Question 1

2 marks

Describe the formation in which the Spanish Armada sailed up the English Channel in July 1588.

Model answer

The Armada sailed in a tight crescent, or half-moon, formation. Its strongest warships were placed on the tips of the crescent and at the rear, protecting the weaker supply ships in the middle, so the English found it very hard to pick off individual ships.

Explanation

The crescent was a strong defensive formation, which is why the English did little damage in the running fight up the Channel. It was only broken when the fireships scattered the Armada at Calais on the night of 28 July.

Mark scheme
  1. 1 mark

    It sailed in a crescent (half-moon) shape.

    Accept 'a crescent formation' / 'a half-moon shape'. One mark per valid point; max 2.

  2. 1 mark

    The strongest warships (galleons and galleasses) were placed on the tips (horns) and at the rear of the crescent.

    Max 2 in total.

  3. 1 mark

    The weaker supply ships and slower ships were protected in the middle.

    Max 2 in total.

  4. 1 mark

    The ships kept close together, so any ship that was attacked could be supported by others and the English found it hard to pick off single ships.

    Max 2 in total.

Question 2

8 marks

Explain what was important about Drake's raid on Cadiz in April 1587 for the Armada campaign.

Model answer

Drake's raid on Cadiz in April 1587 was important because it damaged the Armada before it had even been launched, delaying it by a year and creating problems that weakened it in 1588.

The immediate effect was the destruction of Spanish ships. Drake sailed into Cadiz harbour with a small fleet that included royal warships and destroyed around 30 ships that were being gathered for the invasion of England. He boasted that he had 'singed the King of Spain's beard'. This was a serious blow, because it meant that Philip II could not send the Armada in 1587 as he had hoped. The delay gave England an extra year to prepare its fleet, organise its militia and set up its beacons.

The raid also caused long-term supply problems. After Cadiz, Drake occupied Sagres near Cape St Vincent and destroyed a huge store of seasoned barrel staves, the wood used to make casks. As a result, many of the Armada's barrels in 1588 were made of unseasoned wood. Food went rotten and water leaked away, so the Spanish crews suffered from hunger and disease on the voyage, especially on the long journey home round Scotland and Ireland. Drake also captured a rich Portuguese treasure ship, the Sao Felipe, which cost Philip money and boosted English confidence.

The delay had another important consequence. In February 1588 the Marquis of Santa Cruz, Spain's most experienced admiral, died while the Armada was still being prepared. He was replaced by the Duke of Medina Sidonia, who had little experience of war at sea. So the raid indirectly led to the Armada being commanded by a less experienced man.

The raid did not stop the invasion, because Philip rebuilt his fleet and sent an even larger one in 1588. However, its consequences were linked: the delay gave England time to prepare, the loss of the barrel staves left the Armada badly supplied, and the change of commander weakened its leadership. Together these made the raid an important step towards the Armada's defeat.

Explanation

The raid destroyed around 30 ships and the store of seasoned barrel staves, delaying the Armada to 1588, giving England time to prepare, causing supply problems (rotten food, leaking water) and, during the delay, Santa Cruz died. Level 4 explains several linked consequences with precise detail and judges how far the raid affected the outcome.

Mark scheme
  1. 8 marks

    Levels of response (8 marks).
    Level 4 (7-8 marks): Complex explanation of the importance of the raid on Cadiz, showing how its consequences were linked: e.g. the destruction of ships and stores delayed the Armada by about a year, the loss of seasoned barrel staves led to rotten food and leaking water casks in 1588, the delay gave England time to prepare and meant Santa Cruz died before the fleet sailed; with a judgement about how far it shaped the outcome, supported by precise knowledge.
    Level 3 (5-6 marks): Developed explanation of two or more consequences of the raid, supported by accurate knowledge.
    Level 2 (3-4 marks): Simple explanation of one consequence, e.g. that it destroyed Spanish ships.
    Level 1 (1-2 marks): Basic explanation: general statements about Drake attacking Spain.
    0 marks: nothing worthy of credit.

    Indicative content (not a checklist; credit other valid points): in April 1587 Drake sailed into Cadiz harbour with a small fleet including royal warships and destroyed around 30 ships being gathered for the invasion (accept figures from about 24 to 37); he called it 'singeing the King of Spain's beard'; he then occupied Sagres near Cape St Vincent and destroyed a huge store of seasoned barrel staves, so in 1588 the Armada's casks were made of unseasoned wood - food rotted and water leaked, a serious problem on the long voyage; he captured a valuable Portuguese treasure ship, the Sao Felipe, on his way home; the Armada, which Philip had hoped would sail in 1587, was delayed until 1588; the delay gave England more time to build and arm ships, train men and set up beacons and defences; during the delay the experienced commander Santa Cruz died (February 1588), and the inexperienced Duke of Medina Sidonia took over; the raid boosted English morale and Drake's reputation, and showed that Spanish ports could be attacked; it cost Philip money and time; however, it did not stop the Armada - Philip rebuilt and sent an even larger fleet, so its importance was in weakening, not preventing, the invasion. Possible judgement: very important because its effects (supplies, delay, change of commander) contributed to the Armada's later problems.

Question 3

8 marks

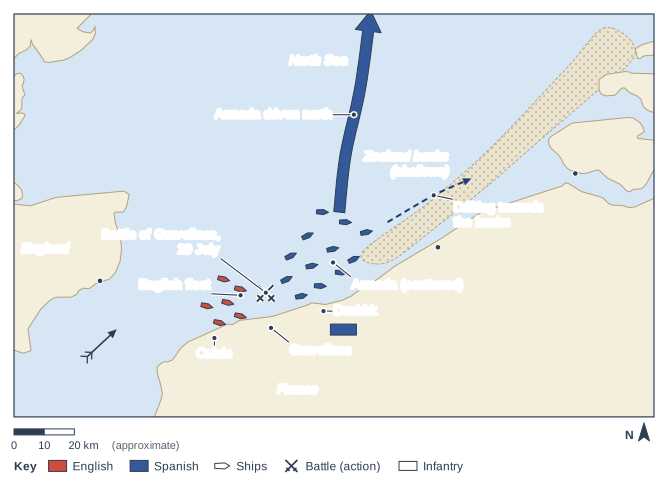
Figure 1 is a plan of the Battle of Gravelines and its aftermath, 29 July 1588. Dates are in the English calendar of 1588.

Explain what was important about the Battle of Gravelines for the defeat of the Spanish Armada.

Map of fleets in a narrow sea off a long coast. Map (north at the top; scale bar 0-20 km, approximate) of a narrow sea between a coast at the top left and a long coast along the bottom, which runs up to the right to an estuary; open sea fills the top of the map and a dotted band lies in the sea off the lower right coast; dots mark places on the coasts. Blue ships are scattered off the lower coast, with red ships to their left and crossed swords between them. A dashed blue arrow points towards a dotted band in the sea off the lower right coast, and a broad blue arrow heads north off the top of the map. A blue block stands on land near the third dot along the lower coast; a feathered arrow at the lower left points up and to the right. A key under the map gives: red, English; blue, Spanish; a pointed ship shape, Ships; crossed swords, Battle (action); a plain block, Infantry. The label "England" is written on the land at the top left; the label "France" is written on the land along the bottom of the map; the label "North Sea" is written on the open sea at the top of the map; the label "Calais" points to the dot on the lower coast at the left; the label "Gravelines" points to the dot on the lower coast just right of the first; the label "Dunkirk" points to the third dot along the lower coast; the label "Zeeland banks (shallows)" is written on the dotted band in the sea off the lower right coast; the label "Battle of Gravelines, 29 July" points to the crossed swords off the lower coast, between the red and blue ships; the label "Armada (scattered)" points to the scattered blue ships off the lower coast; the label "English fleet" points to the red ships off the lower coast at the left; the label "Drifting towards the banks" points to the dashed blue arrow pointing towards the dotted band in the sea; the label "Armada driven north" points to the broad blue arrow heading north off the top of the map.

Model answer

The Battle of Gravelines on 29 July 1588 was important because it was the only time the English did serious damage to the Armada, and because, together with the wind that followed, it drove the Armada away from Parma and ended the invasion.

The battle was the result of the fireship attack the night before. The Spanish had cut their anchor cables and scattered, and at dawn the Armada was strung out along the coast off Gravelines, unable to re-form its crescent. For the first time the English could attack individual ships. They closed in to close range, using the speed of their ships to fire and then pull away, so the Spanish soldiers could not board them. The fighting went on for most of the day, until the English ran short of ammunition and a squall ended the battle.

The damage was serious. The Spanish galleons San Felipe and San Mateo were so badly damaged that they drifted onto the Flemish coast and were captured by the Dutch, and the Maria Juan sank. Many other ships were holed and lost many men, while no English ship was lost. This showed that the English tactics could work when the Spanish formation was broken.

The battle also decided the outcome of the invasion. As Figure 1 shows, after the battle the Armada was driven north-east towards the dangerous shallows of the Zeeland banks. The wind then shifted and blew it north into the North Sea. It could not sail back to Calais against the wind to meet Parma, so Philip II's plan was finished. The English followed it as far as the Firth of Forth before turning back.

Gravelines also made the voyage home more deadly. Ships with damaged hulls and wounded, hungry crews had to sail round Scotland and Ireland, and many of them were wrecked in the storms of September.

Gravelines was therefore the decisive battle of the campaign, because it ended any chance of the invasion succeeding, although most of the Armada escaped it and the greatest losses came later from the weather.

Explanation

At Gravelines the English attacked the scattered Armada at close range, sinking or wrecking several ships, and the battle and the shift of wind drove it into the North Sea so it could never return to Parma; damaged ships then faced the storms. Level 4 explains linked consequences and judges how decisive the battle was.

Mark scheme
  1. 8 marks

    Levels of response (8 marks).
    Level 4 (7-8 marks): Complex explanation of the importance of Gravelines, showing how its consequences were linked: e.g. the English attacked the scattered Armada at close range and did serious damage for the first time; the battle and the wind that followed drove the Armada into the North Sea, ending the invasion; damaged ships and men were less able to survive the voyage home; with a judgement about how decisive it was, supported by precise knowledge.
    Level 3 (5-6 marks): Developed explanation of two or more consequences of the battle, supported by accurate knowledge.
    Level 2 (3-4 marks): Simple explanation of one consequence, e.g. that Spanish ships were sunk.
    Level 1 (1-2 marks): Basic explanation: general statements about the English winning a battle.
    0 marks: nothing worthy of credit.

    Indicative content (not a checklist; credit other valid points): after the fireships (night of 28 July) the Armada was scattered off Gravelines and could not re-form its crescent; on 29 July the English attacked at close range for the first time, using their faster ships and guns while avoiding boarding; the fighting lasted most of the day until the English ran short of ammunition and a squall ended it; several Spanish ships were lost - the galleons San Felipe and San Mateo drifted onto the Flemish coast and were taken by the Dutch, and the Maria Juan sank - and many others were badly damaged, with heavy casualties; no English ship was lost; the next day the Armada was being driven towards the Zeeland banks (Figure 1) until the wind shifted and blew it into the North Sea; it could not return to Calais against the wind to meet Parma, so the invasion was over; the English followed as far as the Firth of Forth; damaged hulls and wounded, hungry men made the long voyage home round Scotland and Ireland even more deadly; Spanish morale collapsed; however, most of the Armada escaped the battle and most losses came later in the storms. Accept the modern date (8 August). Possible judgement: the decisive battle of the campaign because it ended the invasion, but not the main cause of the Armada's destruction.

Question 4

16 marks

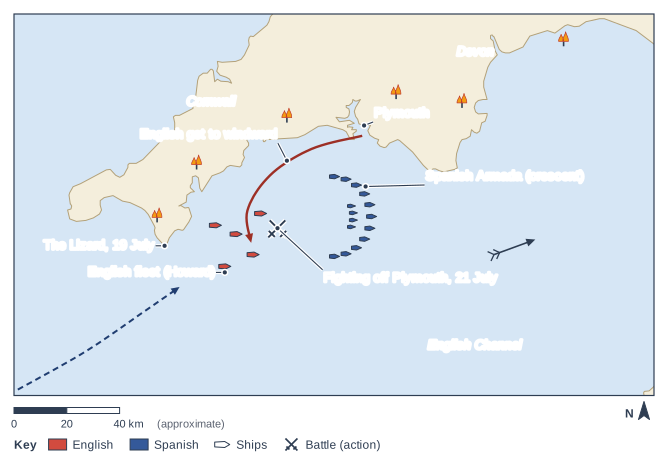
Figure 1 is a plan of the start of the fighting off Plymouth in July 1588. Dates are in the English calendar of 1588.

'The defeat of the Spanish Armada was mainly due to the skill of the English commanders.'

How far does a study of the Spanish Armada support this statement? Explain your answer.

You should refer to the Spanish Armada and your contextual knowledge.

Map of fleets off a peninsula. Map (north at the top; scale bar 0-40 km, approximate) of a long peninsula running out to the left, with open sea below it; dots mark a headland at the bottom of the land on the left and a harbour on the coast in the middle. A dashed blue arrow comes in from the bottom left corner. Off the upper coast near its left end a crescent of blue ships sails towards the right, its tips trailing back; a red arrow runs from a dot on the upper coast round behind (to the left of) the crescent to a group of red ships, and crossed swords stand between them. Small flame symbols stand along the upper coast, and a feathered arrow in the open sea on the right points to the right. A key under the map gives: red, English; blue, Spanish; a pointed ship shape, Ships; crossed swords, Battle (action). The label "Cornwall" is written on the land at the upper left; the label "Devon" is written on the land at the upper right; the label "English Channel" is written on the open sea at the bottom of the map; the label "The Lizard, 19 July" points to the dot on the headland at the bottom of the land on the left; the label "Plymouth" points to the dot on the coast in the middle of the map; the label "Spanish Armada (crescent)" points to the crescent of blue ships off the coast, its tips trailing back; the label "English fleet (Howard)" points to the red ships to the left of (behind) the crescent; the label "English get to windward" points to the red arrow from the dot on the coast curving round behind the crescent; the label "Fighting off Plymouth, 21 July" points to the crossed swords between the red ships and the crescent.

Model answer

The English commanders - Lord Howard of Effingham, with Drake, Hawkins and Frobisher - played an important part in defeating the Armada, especially in the decisions that broke it up at Calais. However, a study of the campaign suggests that their skill worked alongside the advantages of English ships, serious Spanish weaknesses and the weather, which caused most of the Spanish losses.

There is good evidence of the commanders' skill. As Figure 1 shows, when the Armada was sighted off the Lizard on 19 July the English fleet was in Plymouth, but it worked its way out of the harbour and got to windward of the Armada. This gave the English the advantage for the rest of the campaign, because they could choose when and where to fight and the Spanish could never force them to close and board. Howard kept the fleet together, consulted his council of war, and after the fight off Portland divided the fleet into four squadrons under himself, Drake, Hawkins and Frobisher. Off the Isle of Wight the English pushed the Armada away from the Solent, so it could not shelter there. Above all, the commanders took the key decision to send eight fireships into the anchored Armada at Calais on the night of 28 July. The Spanish cut their cables and scattered, and the next day at Gravelines the English closed in and attacked at close range, sinking or wrecking several ships. These were skilful decisions that turned the campaign.

However, their skill had limits. For a week the English attacked the Armada at long range but did little damage, and only two Spanish ships were lost before Calais, both by accident. Drake's decision to leave his place at the head of the fleet to capture the Rosario caused confusion. The English ran short of powder and shot, partly because Elizabeth was reluctant to spend money, and even at Gravelines they could not destroy the Armada.

Other factors were also crucial. The English ships, rebuilt by Hawkins, were faster and better armed than the Spanish ones. The Spanish had serious weaknesses. Philip's plan depended on joining the Duke of Parma's army, but there was no deep-water port, Parma was not ready, and Dutch flyboats blockaded his barges. Medina Sidonia had little naval experience and was bound by Philip's orders, and the fleet was badly supplied after Drake's raid on Cadiz. Finally, the weather played a huge part: after Gravelines the wind drove the Armada away from the Zeeland banks into the North Sea, and on the way home round Scotland and Ireland storms wrecked far more ships than the English had sunk.

These factors were connected. The commanders' skill only worked because they had fast, well-armed ships, and the fireship attack was possible because Philip's plan had left the Armada waiting off Calais. Overall, a study of the Armada supports the statement only partly. The commanders' skill was the main reason why the invasion failed, because it stopped the Armada joining Parma, but the destruction of the Armada was due much more to Spanish weaknesses and the weather.

Explanation

The commanders got to windward off Plymouth, kept the fleet together, used fireships at Calais and attacked at Gravelines, but they did little damage before Calais and ran short of ammunition; English ships, Philip's plan, Parma's absence and the weather were also vital. Level 4 explains several factors, shows how they interacted and sustains a judgement, for example separating the failure of the invasion from the destruction of the fleet.

Mark scheme
  1. 16 marks

    Levels of response (16 marks).
    Level 4 (13-16 marks): Complex explanation of the skill of the English commanders and of other factors (such as English ships and guns, Spanish weaknesses and Philip's plan, Parma and the Dutch blockade, and the weather), showing how they interacted, drawing on precise knowledge of the campaign (for example getting to windward off Plymouth, the fireships, Gravelines), with a sustained judgement about whether the commanders' skill was the main reason.
    Level 3 (9-12 marks): Developed explanation of the commanders' skill and at least one other factor, supported by accurate and relevant knowledge of the campaign.
    Level 2 (5-8 marks): Simple explanation of the commanders or of other factor(s), with some accurate knowledge.
    Level 1 (1-4 marks): Basic explanation: general statements about why the English won, with limited knowledge.
    0 marks: nothing worthy of credit.

    Indicative content (not a checklist; credit other valid points): Skill of the commanders - Lord Howard of Effingham kept the fleet together, consulted his council of war and divided the fleet into four squadrons (Howard, Drake, Hawkins, Frobisher); getting out of Plymouth and to windward (Figure 1) gave the English the advantage throughout; they refused to let the Spanish close and board; Drake captured the Rosario; Frobisher fought hard off Portland; the English stopped the Armada entering the Solent off the Isle of Wight; the decision to send eight fireships into the anchored Armada at Calais (night of 28 July) broke the formation; at Gravelines (29 July) they attacked at close range when the Armada was scattered; Seymour's squadron guarded the Strait of Dover; Hawkins had rebuilt the fleet; Walsingham's intelligence gave warning. Limits to their skill - long-range attacks in the Channel did little damage (only two Spanish ships lost before Calais, both by accident); Drake's lantern episode caused confusion; they ran short of powder and shot (partly because of Elizabeth's thrift); they could not destroy the Armada at Gravelines. Other factors - English race-built galleons and guns; Spanish weaknesses: Philip's plan relied on joining Parma without a deep-water port, Parma was not ready and was blockaded by Dutch flyboats, the inexperienced Medina Sidonia followed rigid orders, poor supplies after the Cadiz raid (1587), Spanish guns and tactics designed for boarding; the weather - storms that drove the Armada into Corunna, the wind that blew it away from the Zeeland banks into the North Sea, and the storms off Scotland and Ireland that caused most losses. Possible judgements: the commanders' skill decided the battle in the Channel and at Calais but most Spanish losses came from the weather; or Spanish weaknesses made the commanders' task possible; or a combination.

Ready to try the rest? Every answer you write is marked against the mark scheme, so you can see exactly where the marks are.

AI Tutor Hints first, answers after you try

Hi! Stuck? Ask me for a hint and I’ll help you work it out. Once you’ve checked your answer I can explain exactly where the marks are.