Level:
Correct: 0
Incorrect: 0
Marks: 0/0
Exam Practice
Subject:
Topics:
Avg
score:
–
Topics
done:
0/9

Military developments in 1918 and their contribution to Germany's defeat

Practise 45 exam-style questions on Military developments in 1918 and their contribution to Germany's defeat for AQA GCSE History (Conflict and tension 1894-1918). Write your answer as you would in the exam and get it marked in seconds against the mark scheme, point by point, with an AI tutor on hand if you get stuck.

  • 45 questions
  • 1–20 marks each
  • Instant marking
  • No sign-up needed
20 questions, marked as you go

Sample questions with model answers

Here are 4 of the questions in this topic, each with a model answer, an explanation of why it earns the marks and the mark scheme an examiner would use.

Question 1

2 marks

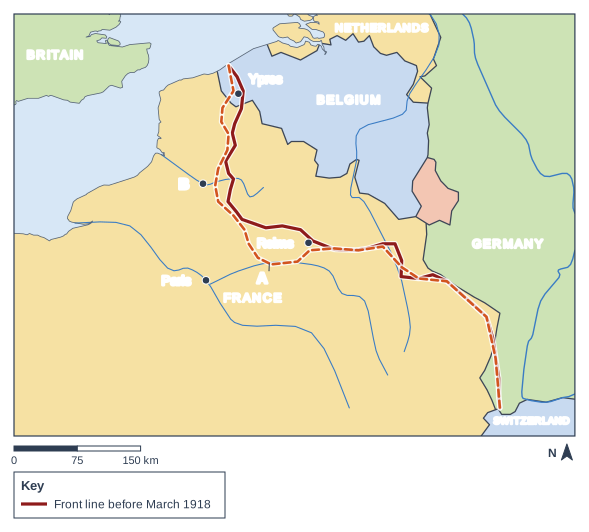
Figure 1 is a map of the Western Front.

What does the line labelled A show, and which city, an important railway junction that German troops came close to capturing in spring 1918, is labelled B?

Map of northern France and Belgium (the Western Front) in 1914, on the eve of the First World War. It is drawn with real coastlines (land pale buff, sea pale blue) and the borders of the time as simplified lines; a north arrow shows north at the top; the scale bar is 150 km long. Each state is shaded a pale colour, with neighbouring states in different colours. State names printed on the map: "GERMANY", "FRANCE", "BRITAIN", "SWITZERLAND", "NETHERLANDS" and "BELGIUM". Blue lines show rivers, not named. A thick dark red line (key: "Front line before March 1918") runs from the top of the map to the bottom right of the map (about 520 km from end to end). A thick dashed orange-red line labelled A runs from the top of the map to the bottom right of the map (about 520 km from end to end). Points: a dot labelled B inland, in the country labelled "FRANCE", near the centre of the map, about 110 km south of the point labelled "Ypres"; a dot labelled "Paris" (inland); a dot labelled "Ypres" (inland); a dot labelled "Reims" (inland). The key (below the map) shows: "Front line before March 1918".

Model answer

Line A shows the furthest German advance in the Spring Offensive, reached by July 1918. B is Amiens.

Explanation

The Spring Offensive pushed two great bulges into the Allied line: towards Amiens (Operation Michael, March-April) and to the River Marne (Blücher-Yorck, May-June). The Germans were stopped at Villers-Bretonneux, about 15 km from Amiens, and the Allied counter-offensive of August 1918 began from there.

Mark scheme
  1. 1 mark

    A: the furthest German advance in the Spring Offensive (the front line in July 1918).

    Accept: how far the Germans got in 1918 / the front line after the German offensives of 1918 / the German advance in Operation Michael and Blücher-Yorck. Do not accept: the front line in 1914 / the Hindenburg Line.

  2. 1 mark

    B: Amiens.

Question 2

4 marks

Source A: from a report written by a German divisional commander to his superiors in August 1918. (Written for practice.)

'The enemy attacked at dawn without any warning bombardment. Tanks appeared out of the mist in great numbers, closely followed by infantry behind a wall of shells. Our batteries had already been located and silenced before the attack began. Enemy aircraft flew low over our positions all day, machine-gunning anything that moved. Our men, worn out and too few, could not hold. Many companies were surrounded before they knew the line had been broken.'

Source A suggests that Allied tactics and technology were very effective by August 1918. How do you know?

Explain your answer by referring to Source A and your contextual knowledge.

Model answer

Source A shows that Allied tactics and technology were very effective because the German commander describes several methods working together. The attack came 'without any warning bombardment', which was possible because the Allies now used predicted fire, so the Germans had no warning, unlike the week-long bombardment before the Somme in 1916. Tanks 'in great numbers' advanced with infantry behind 'a wall of shells', a creeping barrage, and German batteries had been 'located and silenced', which shows how sound ranging and flash spotting allowed counter-battery fire. Low-flying aircraft attacked German troops. This matches the Battle of Amiens on 8 August 1918, when over 400 tanks and hundreds of aircraft supported Australian and Canadian troops in a surprise attack that advanced about 7-8 miles in a day. The commander may stress the enemy's strength to excuse his defeat, but his report still shows the Allies had mastered combined-arms warfare.

Explanation

By 1918 the British army fought an 'all-arms' battle in which infantry, artillery, tanks and aircraft worked together. Level 2 needs developed analysis that links the details in the source to specific tactics or battles such as Amiens.

Mark scheme
  1. 4 marks

    Levels of response (4 marks).
    Level 2 (3-4 marks): Developed analysis of Source A, based on its content and/or provenance, supported by relevant contextual knowledge, e.g. explains how the surprise attack, massed tanks, creeping barrage, counter-battery fire and ground-attack aircraft described show combined-arms tactics, linked to the Battle of Amiens and the development of these methods since 1916.
    Level 1 (1-2 marks): Simple analysis of Source A based on content and/or provenance, e.g. 'it says there were lots of tanks', with little or no contextual knowledge.
    0 marks: nothing worthy of credit.

    Indicative content (not a checklist; credit other valid points): content - 'without any warning bombardment' shows surprise made possible by predicted fire; tanks 'in great numbers' with infantry 'behind a wall of shells' describes tanks and a creeping barrage working together; batteries 'located and silenced' shows sound ranging, flash spotting and counter-battery fire; low-flying aircraft machine-gunning shows ground attack; companies surrounded shows a deep, fast advance. Provenance - a German commander reporting to superiors has every reason to explain his defeat, so may stress enemy strength and play down his own failings, but the admission is still telling; written at the time. Context - the Battle of Amiens (8 August 1918): no preliminary bombardment, fog, over 400 tanks, about 1,900 Allied aircraft, Australian and Canadian infantry; earlier models at Cambrai (November 1917) and Hamel (4 July 1918); contrast with the week-long bombardment before the Somme (1916); the German army was exhausted and short of men after the Spring Offensive, as the source says.

Question 3

12 marks

Source B: from Storm of Steel, the memoir of Ernst Jünger, first published in 1920. Jünger led a company of German stormtroops in the attack of 21 March 1918.

Jünger described the enormous German bombardment that opened before dawn, so loud that the men could not hear each other speak. He wrote about the excitement and fury of his men as they rushed forward through the smoke and mist into the British trenches, how quickly they overran the British positions, and the heavy losses suffered by his own unit.

Source C: from a letter written by a British infantry officer of the Fifth Army to his family, 30 March 1918. (Written for practice.)

'The fog that morning was so thick we could not see twenty yards. The Germans were through our forward posts before we knew they had left their trenches, and came at us from the sides and behind. Since then we have fallen back day after day, with hardly any sleep. We were far too few for the length of line we held, and half our defences were never finished. The men have fought splendidly, but we cannot hold everywhere.'

How useful are Sources B and C to an historian studying the opening of the German Spring Offensive in March 1918?

Explain your answer using Sources B and C and your contextual knowledge.

Model answer

Source B is useful because it gives a German view of how the attack was carried out by someone who took part in it. Jünger describes the enormous bombardment before dawn, which fits what we know about the hurricane bombardment planned by Colonel Bruchmüller: on 21 March 1918 over 6,000 German guns fired gas and high-explosive shells for about five hours from 4.40 am. His description of men rushing forward through smoke and mist and quickly overrunning British positions shows how stormtroop tactics worked, and his comments on his men's excitement show that German morale was high at the start of the offensive. Because Jünger was a stormtroop company commander, he had first-hand knowledge. However, it is a memoir published in 1920, so it may be shaped by hindsight, and Storm of Steel presents war as a heroic experience, so it may glamorise the fighting. It also shows only one small part of a front that was about 50 miles long.

Source C is useful because it explains the attack from the British side and suggests why the line broke. The officer describes the thick fog, which really did hide the German advance on 21 March, and the Germans coming 'from the sides and behind', which shows infiltration tactics in action. His comments that the Fifth Army was 'far too few for the length of line' and that the defences 'were never finished' are supported by my knowledge: the Fifth Army under Gough had recently taken over extra line from the French and its defensive zones were incomplete. The retreat 'day after day' fits the German advance of up to about 40 miles. As a private letter written at the time by an officer in the retreat, it is valuable evidence. However, he was writing to his family, so he may have played down the danger, letters were censored, and he may have wanted to excuse the defeat by blaming fog and lack of men.

Overall, both sources are useful because they show the opening of the offensive from both sides. Source C is more useful for explaining why the British line broke, while Source B is more useful for showing how the Germans attacked and how confident they were. Together they explain why the British suffered about 38,000 casualties on the first day, about 21,000 of them taken prisoner.

Explanation

Operation Michael succeeded at first because of the hurricane bombardment, fog and stormtroop tactics against an overstretched Fifth Army. Level 4 needs evaluation of both sources using content and provenance (Jünger's memoir written after the war, the private letter written during the retreat) and a sustained judgement.

Mark scheme
  1. 12 marks

    Levels of response (12 marks).
    Level 4 (10-12 marks): Complex evaluation of both sources with a sustained judgement about their usefulness for studying the opening of the offensive, based on content AND provenance and supported by contextual knowledge, e.g. Source B gives the attacker's view of the hurricane bombardment and stormtroop advance from a man who led it, though written to glorify the fighting; Source C explains from the defender's side why the British line broke (fog, infiltration, too few men, unfinished defences), written privately at the time though by a tired officer who may excuse the retreat; together they show why Michael succeeded so dramatically.
    Level 3 (7-9 marks): Developed evaluation of both sources based on content and/or provenance, supported by relevant contextual knowledge.
    Level 2 (4-6 marks): Simple evaluation of one or both sources based on content and/or provenance, e.g. 'Source B is useful because Jünger was there'.
    Level 1 (1-3 marks): Basic analysis of one or both sources: describes what they say or who wrote them without explaining usefulness.
    0 marks: nothing worthy of credit.

    Indicative content (not a checklist; credit other valid points): Source B content - the huge opening bombardment (Bruchmüller's five-hour hurricane bombardment from 4.40 am with over 6,000 guns, using gas and high explosive); the speed of the stormtroop advance through smoke and mist; the soldiers' high morale and determination; German losses were also heavy. Source B provenance - Jünger was there as a stormtroop company commander, so first-hand; but it is a memoir written after the war, possibly shaped by hindsight, and Storm of Steel is known for presenting combat as a heroic test, so it may glamorise the fighting; it shows one small part of a very long front. Source C content - the fog on 21 March; stormtroop infiltration (attacks from the sides and behind, bypassing posts); the long retreat; the Fifth Army held too long a front with too few men; incomplete defences. Source C provenance - private letter written at the time by an officer who took part; written to family, so he may play down danger to reassure them, or be shaped by censorship of letters; may excuse defeat by blaming circumstances. Context - Operation Michael began on 21 March 1918 against the British Fifth (Gough) and Third Armies; the Fifth Army had recently taken over more line from the French and its defence-in-depth zones were unfinished; about 38,000 British casualties on the first day, about 21,000 of them prisoners; Germans advanced up to about 40 miles. Judgement - together very useful as attacker and defender perspectives; C more useful for why the British line broke, B for how the Germans attacked and their morale.

Question 4

20 marks

'The German Spring Offensive of 1918 failed mainly because of mistakes made by Ludendorff.'

How far do you agree with this statement?

Explain your answer.

[16 marks] [SPaG 4 marks]

Model answer

Ludendorff made serious mistakes in planning and directing the Spring Offensive, and these help to explain why it failed. However, I think the offensive failed mainly because the German army lacked the means to turn breakthroughs into victory and because the Allies were able to resist and recover, although Ludendorff's mistakes made these problems worse.

Ludendorff's biggest mistake was that he had no clear strategic goal. He concentrated on tactics, breaking through the enemy line, and hoped that a strategic result would follow. When Operation Michael began on 21 March 1918, the fastest progress was made by Hutier's Eighteenth Army in the south, and Ludendorff reinforced it rather than concentrating on capturing Amiens, the vital railway centre, or splitting the British from the French. When Michael stalled at Villers-Bretonneux in early April, he switched to Flanders (Georgette, 9 April), then to the Aisne (Blücher-Yorck, 27 May) and finally to the Marne (15 July). Each attack gained ground but none was decisive. Each also created a salient that lengthened the German front, and each used up more of the elite stormtroop divisions that Germany could not replace. This suggests Ludendorff wasted Germany's best chance of victory.

However, the German army had weaknesses that no commander could easily have overcome. Germany had almost no tanks, few lorries and little cavalry, so once the stormtroopers had broken through, there was nothing fast enough to exploit the gap. Supplies and guns could not keep up across the devastated Somme battlefield. The British naval blockade meant German soldiers were badly fed, so many stopped to loot Allied stores, as at Albert, and from June influenza spread through the army. These problems were caused by Germany's lack of resources rather than by Ludendorff's decisions.

Allied resistance was also very important. The British fought hard, as shown by Haig's 'Backs to the Wall' order of 11 April and the Australian recapture of Villers-Bretonneux. Crucially, the Allies created a unified command: at Doullens on 26 March Foch was appointed to co-ordinate the Allied armies, and he moved French reserves to support the British and kept enough reserves to counter-attack. On the Marne, Gouraud's defence in depth stopped the attack of 15 July, and Foch's counter-attack on 18 July forced the Germans to retreat. American troops also helped, fighting at Château-Thierry and Belleau Wood, and by July over a million Americans were in France, so the Allies could replace their losses while Germany could not.

In conclusion, I partly agree with the statement. Ludendorff's lack of a clear objective and his habit of switching attacks wasted Germany's limited strength and made failure more likely. But even a better plan would have struggled, because Germany lacked the tanks, transport and food to sustain an advance, while the Allies, under Foch's unified command and with American reinforcements, could resist and recover. The offensive therefore failed mainly because of German weakness and Allied strength, with Ludendorff's mistakes making a difficult situation worse.

Explanation

Ludendorff's lack of a strategic objective and his switching of attacks wasted Germany's last reserves, but the lack of tanks and transport, the effects of the blockade, Allied resistance under Foch and American troops also explain the failure. Level 4 needs a sustained judgement weighing Ludendorff's mistakes against other factors.

Mark scheme
  1. 16 marks

    Levels of response (16 marks).
    Level 4 (13-16 marks): Complex explanation of Ludendorff's mistakes and of other factors (German army weaknesses, the effects of the blockade, Allied resistance and Foch's command, American troops), showing how they were linked, leading to a sustained judgement about the main reason for the offensive's failure, supported by a range of accurate, relevant knowledge.
    Level 3 (9-12 marks): Developed explanation of Ludendorff's mistakes and other factors, supported by accurate knowledge; a judgement may be given but is not fully sustained.
    Level 2 (5-8 marks): Simple explanation of Ludendorff's role or other factors, e.g. describes the offensives and says they ran out of steam.
    Level 1 (1-4 marks): Basic explanation: general statements, e.g. 'Ludendorff made bad decisions'.
    0 marks: nothing worthy of credit.

    Indicative content (not a checklist; credit other valid points): Ludendorff's mistakes - no clear strategic objective (he is reported to have said that tactics mattered more than strategy, and to 'punch a hole' and see what followed); he reinforced success where the Germans advanced fastest (Hutier's Eighteenth Army) rather than concentrating on Amiens and splitting the British from the French; switched attacks - Michael (21 March), Georgette (9 April, Flanders), Blücher-Yorck (27 May, Aisne), Gneisenau (June), Marne-Reims (15 July) - none decisive; created salients that lengthened the line; used up the best stormtroop divisions; Blücher-Yorck succeeded beyond expectations and drew him away from Flanders. Other factors - German army weaknesses: no tanks to speak of, few lorries, little cavalry to exploit breakthroughs; supplies and artillery could not keep up across the devastated Somme battlefield; hunger caused by the blockade, looting (Albert), influenza from June; Allied resistance: Haig's 'Backs to the Wall' order (11 April), the defence of Villers-Bretonneux (April), French reserves; Foch appointed co-ordinator at Doullens (26 March) and given strategic direction, managing reserves; Gouraud's defence in depth east of Reims (15 July) and the counter-attack of 18 July; American troops - Château-Thierry and Belleau Wood, about 1 million in France by July; Allied material superiority. Possible judgements - Ludendorff's lack of a clear plan was the main reason; or the offensive was doomed by Germany's lack of resources and Allied strength whatever he did; or his mistakes mattered because they wasted Germany's limited resources.

  2. 4 marks

    SPaG. High performance (4 marks): spells and punctuates with consistent accuracy; uses rules of grammar with effective control of meaning overall; uses a wide range of specialist terms as appropriate.
    Intermediate performance (2-3 marks): spells and punctuates with considerable accuracy; uses rules of grammar with general control of meaning overall; uses a good range of specialist terms as appropriate.
    Threshold performance (1 mark): spells and punctuates with reasonable accuracy; uses rules of grammar with some control of meaning and any errors do not significantly hinder meaning overall; uses a limited range of specialist terms as appropriate.
    0 marks: the student writes nothing, or the response does not relate to the question, or errors severely hinder meaning.

    SPaG marks are awarded only if the answer relates to the question.

Ready to try the rest? Every answer you write is marked against the mark scheme, so you can see exactly where the marks are.

AI Tutor Hints first, answers after you try

Hi! Stuck? Ask me for a hint and I’ll help you work it out. Once you’ve checked your answer I can explain exactly where the marks are.