Level:
Correct: 0
Incorrect: 0
Marks: 0/0
Exam Practice
Subject:
Topics:
AQA GCSE History (Restoration England) Smart practice A mixed round aimed at your weak spots
Unit 1
Part one: Crown, Parliament, plots and court life
Unit 2
Part two: Life in Restoration England
Life in Restoration England
Crisis
0%
Restoration culture
0%
Unit 3
Part three: Land, trade and war
Unit 4
Part four: The historic environment of Restoration England
Avg
score:
–
Topics
done:
0/10

Historic environment: the Dutch Raid on the Medway, June 1667 (2027 exams)

Practise 35 exam-style questions on Historic environment: the Dutch Raid on the Medway, June 1667 (2027 exams) for AQA GCSE History (Restoration England). Write your answer as you would in the exam and get it marked in seconds against the mark scheme, point by point, with an AI tutor on hand if you get stuck.

  • 35 questions
  • 1–16 marks each
  • Instant marking
  • No sign-up needed
20 questions, marked as you go

Sample questions with model answers

Here are 4 of the questions in this topic, each with a model answer, an explanation of why it earns the marks and the mark scheme an examiner would use.

Question 1

2 marks

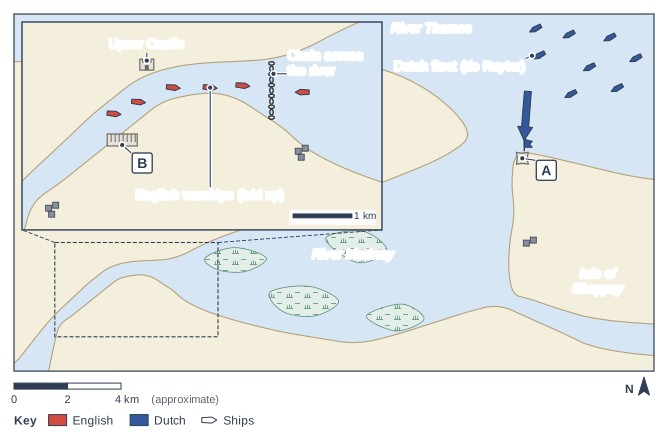
Figure 1 is a plan of the mouth of the River Medway and the Thames estuary on 10 June 1667, the first day of the Dutch attack.

Name the fort labelled A, at the mouth of the Medway, and the naval dockyard labelled B.

Map of ships on a winding river estuary, with an enlarged inset. Map (north at the top; scale bar 0-4 km, approximate) of a river estuary: open water runs across the top of the map, and a winding river enters it at the top right beside a star-shaped symbol on the corner of an island, then runs south-west between low banks and islands shaded with small tufts, narrowing towards the bottom left, where a dashed box is shown enlarged in an inset at the top left (with a 1 km scale bar). In the inset a line of rings crosses the river; above it a small crenellated building stands on the north bank and a long building on the south bank, with buildings by the rings and at the bottom left. Blue ships lie in the open water at the top right; a blue arrow points from them to the star-shaped symbol, which flies a blue flag. In the inset, red ships lie in the river above a line of rings stretched across it. A key under the map gives: red, English; blue, Dutch; a pointed ship shape, Ships. Label A points to the star-shaped symbol at the mouth of the river; label B points to the long building on the south bank in the enlarged inset; the label "Chain across the river" points to the line of rings across the river in the enlarged inset; the label "Upnor Castle" points to the small crenellated building on the north bank in the enlarged inset; the label "Dutch fleet (de Ruyter)" points to the blue ships in the open water at the top right; the label "English warships (laid up)" points to the red ships in the river in the enlarged inset; the label "River Thames" is written on the open water across the top of the map; the label "River Medway" is written on the winding river running from the top right to the bottom left; the label "Isle of Sheppey" is written on the island on the right.

Model answer

A is the fort at Sheerness, which was still being built and was taken by the Dutch on 10 June 1667. B is Chatham Dockyard, the navy's main base on the Medway.

Explanation

Sheerness guarded the mouth of the Medway but was unfinished, so it fell on the first day; Chatham Dockyard, further up the river behind the chain, was where the laid-up English fleet lay. Knowing the layout of the river helps explain how the Dutch reached the ships.

Mark scheme
  1. 1 mark

    A: Sheerness (the unfinished fort at Sheerness).

    Accept Sheerness fort / Sheerness.

  2. 1 mark

    B: Chatham (Chatham Dockyard).

    Accept Chatham.

Question 2

8 marks

Write an account of the ways in which the English tried to defend the River Medway against the Dutch in June 1667.

Model answer

The English defence of the Medway was poorly prepared and largely failed, although it did stop the Dutch going further.

Before the raid, the government relied on a few fixed defences. The great ships, laid up 'in ordinary', lay above an iron chain stretched across the river at Gillingham, guarded by ships including the Unity, the Matthias and the Charles V. At the mouth of the river a new fort was being built at Sheerness, and Upnor Castle, an Elizabethan fort opposite Chatham Dockyard, guarded the anchorage. These defences were weak because of the shortage of money: Sheerness was unfinished and had few guns.

When the Dutch arrived, the first defence collapsed quickly. On 10 June they bombarded Sheerness and landed, and the small garrison fled. On 11 June the Duke of Albemarle, George Monck, reached Chatham. He found chaos: few men, little ammunition and unpaid dockyard workers who had stayed away. He ordered ships to be sunk as blockships to close the channel near the chain and set up gun batteries, but there was too little time. The Commissioner at Chatham, Peter Pett, had not moved the Royal Charles to safety upriver.

On 12 June the Dutch broke through the chain, captured the Unity and the Royal Charles and burned the Matthias and the Charles V. The blockships had not closed the channel. On 13 June the guns of Upnor Castle and the shore batteries fired on the Dutch, but they still burned the Royal Oak, the Loyal London and the Royal James; Captain Archibald Douglas refused to leave the burning Royal Oak and died on board. The defence did achieve something: the Dutch did not land at the dockyard or push further upstream, and they withdrew on 14 June. But the lack of money, men and preparation meant that the English could not save their fleet.

Explanation

The defences were the chain at Gillingham with guard ships, the unfinished Sheerness fort and Upnor Castle, plus Albemarle's last-minute blockships and batteries; most failed because of lack of money, men and time. Level 4 gives a clear sequence and analyses why the defence failed and what it achieved.

Mark scheme
  1. 8 marks

    Levels of response (8 marks).
    Level 4 (7-8 marks): Complex analysis of the defence: a coherent narrative of the English measures in sequence (the existing defences, Sheerness, Albemarle's efforts, the chain and blockships, Upnor Castle and the batteries) that analyses why they largely failed and what they did achieve, with precise, accurate knowledge.
    Level 3 (5-6 marks): Developed analysis: a narrative of two or more defensive measures, explaining how they worked or why they failed, with specific knowledge.
    Level 2 (3-4 marks): Simple analysis: a narrative of one or more measures (e.g. the chain across the river) with simple explanation.
    Level 1 (1-2 marks): Basic analysis: general statements about the English defence.
    0 marks: nothing worthy of credit.

    Indicative content (not a checklist; credit other valid points): Before the raid: the great ships were laid up 'in ordinary' above an iron chain stretched across the river at Gillingham, guarded by ships including the Unity, Matthias and Charles V; a fort was being built at Sheerness at the mouth of the river but was unfinished with few guns; Upnor Castle (Elizabethan, 1559-67) guarded the anchorage opposite Chatham. 10 June: the Dutch bombarded and landed at Sheerness, whose small garrison fled. 11 June: the Duke of Albemarle (George Monck) arrived at Chatham, found few men, little ammunition and absent, unpaid dockyard workers; ordered ships sunk as blockships to close the channel and set up gun batteries; Peter Pett, the Commissioner at Chatham, failed to move the Royal Charles upriver. 12 June: the Dutch broke through the chain, took the Unity and the Royal Charles and burned the Matthias and Charles V; the blockships had not closed the channel. 13 June: Upnor Castle and shore batteries fired on the Dutch, who burned the Royal Oak, Loyal London and Royal James; Captain Archibald Douglas stayed on board the burning Royal Oak and died. Wider measures: militia called out; ships sunk in the Thames near Woolwich to protect London; batteries at Woolwich and Gravesend. Results: the Dutch did not land at Chatham Dockyard or go further upstream, and withdrew on 14 June; but the defence failed to save the fleet because of lack of money, men and preparation.

Question 3

8 marks

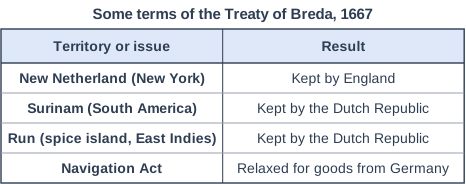
Figure 1 is a table showing some of the terms of the Treaty of Breda, July 1667.

Explain what was important about the Treaty of Breda for England.

Some terms of the Treaty of Breda, 1667. Table with columns "Territory or issue", "Result". Territory or issue: New Netherland (New York); Result: Kept by England | Territory or issue: Surinam (South America); Result: Kept by the Dutch Republic | Territory or issue: Run (spice island, East Indies); Result: Kept by the Dutch Republic | Territory or issue: Navigation Act; Result: Relaxed for goods from Germany.

Model answer

The Treaty of Breda was important for England because it ended a war England could no longer afford, but on terms that showed how weak the raid had left it.

Firstly, the treaty ended the war. Peace talks had begun at Breda in May 1667, but the raid on the Medway in June left England with its best ships burned or captured and the Dutch blockading the Thames. After the plague and the Great Fire, the Crown had no money to rebuild the fleet quickly, so England's negotiators accepted terms within weeks, and the treaty was signed in July 1667.

Secondly, England kept its most important gain of the war. As the table shows, it kept New Netherland, captured in 1664, whose main town, New Amsterdam, had been renamed New York after the Duke of York. This joined England's colonies in New England to those further south and became a valuable port, so in the long run it was a significant gain.

However, England also made important concessions. The Dutch kept Surinam, with its sugar plantations, and England gave up its claim to the spice island of Run. The Navigation Act was relaxed so that Dutch ships could bring goods from Germany into England, which was a retreat from the trading policy that had caused the war. Many people saw these terms as the price of the humiliation at the Medway, and they added to the attacks on the Earl of Clarendon, who was dismissed in August.

Finally, the treaty did not end the rivalry. England joined the Dutch in the Triple Alliance of 1668, but Charles II still resented the humiliation, and in 1672 he went to war with the Dutch again, allied with France. Overall, Breda mattered because it ended an unaffordable war and kept New York, but its terms reflected the weakness exposed by the raid.

Explanation

Breda ended the war in July 1667: England kept New York but the Dutch kept Surinam and Run and the Navigation Act was relaxed, terms widely seen as the price of the Medway disaster. Level 4 goes beyond the table to explain several consequences and reach a judgement.

Mark scheme
  1. 8 marks

    Levels of response (8 marks).
    Level 4 (7-8 marks): Complex explanation of the importance of the treaty: explains two or more consequences for England (e.g. ending an unaffordable war, keeping New York, the concessions to the Dutch over Surinam, Run and the Navigation Act, the link to the humiliation of the raid, the change in foreign policy that followed) and links them or makes a judgement, with precise knowledge beyond the table.
    Level 3 (5-6 marks): Developed explanation of two or more ways in which the treaty was important, supported by specific knowledge.
    Level 2 (3-4 marks): Simple explanation of one way, e.g. that England kept New York.
    Level 1 (1-2 marks): Basic explanation: general statements, or copying terms from the table with little explanation.
    0 marks: nothing worthy of credit.

    Indicative content (not a checklist; credit other valid points): Ending the war: peace talks had begun at Breda in May 1667; England could no longer afford the war after the plague and the Fire, and after the raid it had no fleet ready to break the Dutch blockade of the Thames, so it accepted terms quickly; the treaty was signed in July 1667, only weeks after the raid. New York: England kept New Netherland, taken in 1664 (New Amsterdam renamed New York after the Duke of York) - a valuable colony that linked England's colonies in New England and Virginia and became a great port. Concessions: the Dutch kept Surinam (taken in 1667), with its sugar plantations, and England gave up its claim to the spice island of Run; the Navigation Act was relaxed so that Dutch ships could bring goods from Germany (down the Rhine) - a retreat from the policy behind the war. Humiliation: the terms were more favourable to the Dutch than England had hoped and were seen as the price of the Medway disaster; together with the raid they added to the attacks on Clarendon (dismissed August 1667). Foreign policy: in 1668 England joined the Dutch and Sweden in the Triple Alliance against France, but Charles still wanted revenge, leading to the Secret Treaty of Dover (1670) and the Third Anglo-Dutch War (1672-74). Credit a judgement, e.g. that Breda was a disappointing end to the war but gave England New York.

Question 4

16 marks

'The Dutch Raid on the Medway was the greatest humiliation of Charles II's reign.'

How far does a study of the Dutch Raid on the Medway support this statement? Explain your answer.

You should refer to the Dutch Raid on the Medway and your contextual knowledge.

Model answer

The Dutch Raid on the Medway was certainly one of the most humiliating events of Charles II's reign. A study of the raid supports the statement to a large extent, because it was a national, public and very visible disgrace. However, other events, especially the crises of the 1670s and the Exclusion Crisis, were more serious threats to the King, even if he survived them.

The raid humiliated Charles in many ways. It is often described as the worst defeat in the history of the Royal Navy. An enemy fleet sailed into the Thames estuary, took the fort at Sheerness on 10 June 1667, broke the chain across the Medway at Gillingham and burned three of the navy's greatest ships, the Royal Oak, the Loyal London and the Royal James, close to Upnor Castle and Chatham Dockyard. Most humiliating of all, the Dutch captured the flagship Royal Charles, which, as the Naseby, had carried Charles home from exile in 1660. It was towed away to the Netherlands as a trophy, and its carved stern with the royal arms can still be seen in Amsterdam. The humiliation was public. Londoners panicked: Samuel Pepys sent his gold out of the city and feared that 'the whole kingdom is undone', and John Evelyn called the raid a dishonour never to be wiped off. The Dutch blockaded the Thames for weeks, and England had to make peace at Breda on terms favourable to the Dutch.

The raid also humiliated the King politically. Gossip claimed that he had spent the night the ships burned at supper with his mistress, Lady Castlemaine, and satirists such as Andrew Marvell attacked his court. Charles had to sacrifice his chief minister, the Earl of Clarendon, and Parliament investigated the failures of the war and how the money had been spent.

However, there were other humiliations. The sale of Dunkirk to France in 1662 was deeply unpopular, and crowds remembered it in 1667 with the rhyme 'Three sights to be seen: Dunkirk, Tangier, and a barren Queen'. In 1672 the Crown's debts forced the Stop of the Exchequer, effectively a royal bankruptcy. In 1673 Parliament forced Charles to withdraw his Declaration of Indulgence and accept the Test Act, which drove his brother James out of his post as Lord High Admiral. The Third Anglo-Dutch War, fought with French help, ended in 1674 without the victory Charles wanted. Tangier, part of the Queen's dowry, was abandoned in 1684 after costing huge sums.

The most serious challenge of all was the Popish Plot of 1678 and the Exclusion Crisis of 1679-81. Parliament tried to exclude James from the succession, which threatened the hereditary monarchy itself, and Charles's minister Danby was impeached. These crises were more dangerous than the raid because they challenged the King's authority and the future of the dynasty. However, Charles won in the end: he dissolved the Oxford Parliament in 1681 and ruled without Parliament until his death in 1685. The raid, by contrast, was a defeat he could never reverse.

Overall, a study of the Dutch Raid on the Medway supports the statement to a large extent. The Exclusion Crisis was a greater threat to the monarchy, but Charles emerged from it stronger. The raid was the greatest humiliation, because it was a complete, public defeat by a foreign enemy in the King's own river, symbolised by the loss of the very ship that had restored him.

Explanation

The raid was a public naval disaster (Sheerness, the chain, the burned ships and above all the captured Royal Charles), followed by panic, blockade, Breda and Clarendon's fall; other humiliations include Dunkirk, the Stop of the Exchequer, the 1673 retreat and the Exclusion Crisis. Level 4 compares the raid with other events across the reign and reaches a sustained judgement.

Mark scheme
  1. 16 marks

    Levels of response (16 marks).
    Level 4 (13-16 marks): Complex explanation of why the raid was a humiliation and of other humiliations or setbacks of the reign (e.g. the sale of Dunkirk, the Stop of the Exchequer, the withdrawal of the Declaration of Indulgence, the Popish Plot and Exclusion Crisis, the abandonment of Tangier), drawing on detailed knowledge of the raid and the wider period, with a sustained judgement about whether the raid was the greatest.
    Level 3 (9-12 marks): Developed explanation of the raid as a humiliation and of at least one other humiliation or setback, supported by specific knowledge.
    Level 2 (5-8 marks): Simple explanation of the raid as a humiliation or of other setbacks, with some knowledge.
    Level 1 (1-4 marks): Basic explanation: general statements about the raid or the reign, with limited knowledge.
    0 marks: nothing worthy of credit.

    Indicative content (not a checklist; credit other valid points): The raid as humiliation - often called the worst defeat in the history of the Royal Navy; an enemy fleet in the King's own river, close to London; the Royal Charles (formerly the Naseby), the ship that had carried Charles home in 1660, captured and towed away as a trophy (its stern in the Rijksmuseum); the Royal Oak, Loyal London and Royal James burned; Sheerness taken; panic in London (Pepys feared 'the whole kingdom is undone'); the Thames blockaded for weeks; John Evelyn called it a dishonour never to be wiped off; Dutch celebrations; peace at Breda on Dutch-favoured terms; satire (Marvell) and gossip about the King's mistresses; Clarendon's fall; Parliament's inquiries. Other humiliations - the sale of Dunkirk to France (1662), unpopular and remembered in 1667 ('Dunkirk, Tangier, and a barren Queen'); the Stop of the Exchequer (1672), effectively royal bankruptcy; Parliament forced Charles to withdraw the Declaration of Indulgence (1673) and accept the Test Act, which forced his brother James to resign as Lord High Admiral; the Third Anglo-Dutch War (1672-74) ended without success; Danby's impeachment (1678-79), after letters revealed his secret negotiations for French subsidies; the Popish Plot (1678) and Exclusion Crisis (1679-81), when Parliament tried to exclude James from the succession; the abandonment of Tangier (1684) after huge cost; the Queen had no children. Counter-arguments - many of these were political defeats Charles later reversed: he defeated Exclusion at the Oxford Parliament (1681) and ruled without Parliament until 1685; the raid was a short, sharp shock and England kept New York at Breda. Possible judgements - the raid was the greatest public and national humiliation because it was a foreign defeat in full view of London; or the Exclusion Crisis was a greater threat to the monarchy, though Charles won it; or the Stop of the Exchequer and the 1673 retreat were more damaging in the long run.

Ready to try the rest? Every answer you write is marked against the mark scheme, so you can see exactly where the marks are.

AI Tutor Hints first, answers after you try

Hi! Stuck? Ask me for a hint and I’ll help you work it out. Once you’ve checked your answer I can explain exactly where the marks are.