Level:
Correct: 0
Incorrect: 0
Marks: 0/0
Exam Practice
Subject:
Topics:
AQA GCSE History (Norman England) Smart practice A mixed round aimed at your weak spots
Unit 1
Part one: The Normans: conquest and control
Unit 2
Part two: Life under the Normans
Unit 3
Part three: The Norman Church and monasticism
The Norman Church and monasticism
The Church
0%
Monasticism
0%
Unit 4
Part four: The historic environment of Norman England
Avg
score:
–
Topics
done:
0/9

Military aspects

Practise 43 exam-style questions on Military aspects for AQA GCSE History (Norman England). Write your answer as you would in the exam and get it marked in seconds against the mark scheme, point by point, with an AI tutor on hand if you get stuck.

  • 43 questions
  • 1–16 marks each
  • Instant marking
  • No sign-up needed
20 questions, marked as you go

Sample questions with model answers

Here are 4 of the questions in this topic, each with a model answer, an explanation of why it earns the marks and the mark scheme an examiner would use.

Question 1

2 marks

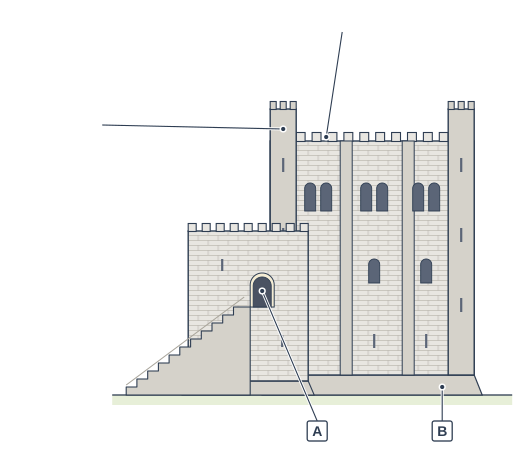
Figure 1 is a drawing of a typical Norman stone keep.

Name the features labelled A and B.

Elevation of a stone tower. Drawing of a tall square stone tower from the front (not to scale). It has thick stone walls rising from a sloping base, flat vertical strips up the walls, tall square towers at the ends, with narrow vertical openings, rising above a notched parapet round the top. The openings are only very narrow ones at the bottom, small round-topped ones in the middle and larger paired ones near the top. On the left a lower block, with its own notched parapet, is built against the front; a stepped structure climbs along it to a round-headed doorway well above the ground, and there is no door at ground level. Label A points to the round-headed doorway well above the ground, at the top of the climb from the left; label B points to the wider band at the foot of the walls; the label "Battlements" points to the notched parapet along the top of the walls; the label "Corner turret" points to the tall square tower rising above the top at the left-hand end.

Model answer

A is the entrance at first-floor level, reached by the steps beside the forebuilding. B is the sloping plinth at the base of the walls.

Explanation

Norman stone keeps such as Colchester and the White Tower had no door at ground level: the entrance was raised to the first floor, so attackers could not batter it down easily. The sloping plinth thickened the base of the wall, making it harder to undermine or batter, and stones dropped from above bounced outwards onto attackers.

Mark scheme
  1. 1 mark

    A: the entrance at first-floor level.

    Accept 'raised entrance', 'first-floor door', 'doorway reached by the steps'. Do not accept 'door' or 'entrance' alone without the idea that it is raised.

  2. 1 mark

    B: the sloping plinth (the sloping base of the wall).

    Accept 'plinth', 'battered base', 'splayed base', 'sloping wall base'. Do not accept 'foundations' or 'moat'.

Question 2

8 marks

Interpretation A: from a history of warfare written for general readers in 1980. (Written for practice.)
At Hastings the age of the foot soldier gave way to the age of the knight. The Norman mounted knight, with his stirrups, high saddle, lance and warhorse bred for battle, was the most powerful weapon in Europe. The English, who rode to battle but fought on foot, were hopelessly old-fashioned. Once the Norman cavalry were let loose, there was nothing the shield wall could do, and the old English way of war died on Senlac Hill.

How convincing is Interpretation A about the importance of cavalry in the Norman victory at Hastings? Explain your answer based on your contextual knowledge and what it says in Interpretation A.

Model answer

Interpretation A is convincing in some ways. Norman knights were a formidable force: they trained from boyhood to fight on horseback, rode warhorses bred for battle - William shipped thousands of horses across the Channel - and used stirrups and high saddles that gave them a firm seat for lance and sword. The English had nothing like this; the housecarls and the fyrd rode to battle but fought on foot. At Hastings the mobility of the cavalry was vital. When the Bretons fled and English soldiers chased them down the slope, Norman knights turned and cut them down on a hillock. Mounted knights also carried out the feigned retreats that drew more English off the ridge, and they led the final assault. After the battle, knights based in castles let the Normans control the countryside.

However, A exaggerates. For most of the day the cavalry achieved little. Charging up the slope of Senlac Hill, the knights could not break the shield wall, and the Bayeux Tapestry shows horses and riders falling to English axes. So A's claim that there was 'nothing the shield wall could do' is wrong: it held from about 9 am into the late afternoon. The Normans won by combining their forces: archers shooting high so their arrows fell behind the shield wall, infantry attacks and cavalry together wore the English down. The English also lost because men broke ranks, because they were tired after Stamford Bridge, and above all because Harold was killed. Nor was the English way of war 'hopelessly old-fashioned' - it had beaten Hardrada only three weeks before.

Overall, Interpretation A is only partly convincing. Cavalry gave William a mobile force the English lacked, but it won the battle only in combination with archers and infantry and after English mistakes.

Explanation

Norman cavalry gave William mobility that the English lacked and was vital in exploiting English break-outs, but cavalry charges failed for hours against the shield wall and victory came from combined arms and Harold's death. Level 4 evaluates the interpretation's strong claims against specific evidence on both sides and sustains a judgement; describing knights without testing the interpretation is Level 2.

Mark scheme
  1. 8 marks

    Levels of response (8 marks).
    Level 4 (7-8 marks): Complex evaluation of Interpretation A with a sustained judgement based on contextual knowledge, e.g. supports its claims about Norman knights, horses and mobility with specific examples from the battle, and challenges its claims that cavalry alone was decisive and that the English were hopelessly old-fashioned (failed cavalry charges uphill, the shield wall holding for most of the day, the combined use of archers and infantry, Harold's death, English success at Stamford Bridge), reaching a sustained judgement.
    Level 3 (5-6 marks): Developed evaluation of Interpretation A based on contextual knowledge: explains, with specific knowledge, how far its claims are supported and/or challenged.
    Level 2 (3-4 marks): Simple evaluation of Interpretation A based on contextual knowledge, e.g. agrees that the Normans had cavalry and the English did not.
    Level 1 (1-2 marks): Basic analysis of Interpretation A: identifies or paraphrases what it says, with little or no contextual knowledge.
    0 marks: nothing worthy of credit.

    Indicative content (not a checklist; credit other valid points): Convincing: Norman knights trained from boyhood to fight on horseback; they rode warhorses (destriers) shipped across the Channel (the Bayeux Tapestry shows horses in the ships); stirrups and high saddles gave a firm seat for using lance and sword; the English had no cavalry - housecarls and fyrd rode to battle but fought on foot; the mobility of cavalry let the Normans cut down the English who chased the Bretons (on the hillock), carry out the feigned retreats and turn on pursuers, and make the final assault; after the battle knights based in castles controlled the countryside. Less convincing: for most of the day the cavalry could do little - charges up the slope of Senlac Hill failed against the shield wall, and the Bayeux Tapestry shows horses and riders falling to English axes; 'nothing the shield wall could do' is wrong - it held from about 9 am into the late afternoon; the Normans won by combining archers (and crossbowmen), infantry and cavalry - arrows shot high late in the day were vital; the English lost partly because men broke ranks, because they were tired after Stamford Bridge and the march south, and because Harold was killed; the English way of fighting had just beaten Hardrada at Stamford Bridge; stirrups were not new and were known in England. Possible judgement: convincing that cavalry gave the Normans a mobile striking force that the English lacked, but exaggerated - the cavalry won only when used with archers and infantry and after English mistakes.

Question 3

8 marks

Explain what was important about the death of King Harold at the Battle of Hastings.

Model answer

Harold's death was important first because it decided the battle. He was killed late in the afternoon of 14 October 1066 beside his standards; how he died is debated - the Bayeux Tapestry seems to show an arrow at his eye, while the Carmen says he was cut down by knights including William himself. Once the king had fallen, the shield wall broke. Some housecarls fought on around his body, but most of the English fled at dusk. Had Harold survived, he might have withdrawn and fought again.

Secondly, his death left England without a leader. His brothers Gyrth and Leofwine had also been killed in the battle, so the Godwin family, the most powerful in England, had lost all its adult leaders at once. The only male of the old royal family left was Edgar Atheling, a teenager. Some English leaders in London proclaimed him king, but he was never crowned, and powerful earls such as Edwin and Morcar would not risk another battle for him.

Thirdly, this lack of leadership allowed William to take the throne quickly. He marched through Dover and Canterbury, crossed the Thames at Wallingford, where Archbishop Stigand submitted, and at Berkhamsted received the submission of Edgar, Archbishop Ealdred and other leaders. He was crowned in Westminster Abbey on Christmas Day 1066. To the Normans, Harold's death also seemed to be God's judgement on a man who had broken his oath to William, which strengthened William's claim.

So Harold's death was important because it turned one battle into the conquest of a kingdom: with no strong leader to rally behind, the English could not continue the war in 1066, although resistance would break out again in the revolts of 1067-71.

Explanation

Harold's death (with his brothers Gyrth and Leofwine) caused the English collapse at Hastings, left only the teenage Edgar Atheling as an alternative king and allowed William to secure submission at Berkhamsted and his coronation. Level 4 explains several linked consequences; arguing about how Harold died, without explaining why his death mattered, is Level 1-2.

Mark scheme
  1. 8 marks

    Levels of response (8 marks).
    Level 4 (7-8 marks): Complex explanation of the importance of Harold's death: explains two or more consequences (e.g. the collapse of the English army at the end of the battle, the loss of the Godwin brothers and of strong leadership, the failure of the English to unite behind Edgar Atheling, the submission at Berkhamsted and William's coronation) and how they were linked, supported by a range of accurate knowledge.
    Level 3 (5-6 marks): Developed explanation of two or more consequences of Harold's death, supported by accurate knowledge.
    Level 2 (3-4 marks): Simple explanation of one consequence, e.g. the English army ran away when Harold was killed.
    Level 1 (1-2 marks): Basic explanation: general statements with little specific knowledge.
    0 marks: nothing worthy of credit.

    Indicative content (not a checklist; credit other valid points): Harold was killed late in the afternoon of 14 October 1066 beside his standards; how he died is debated - the Bayeux Tapestry shows a figure with an arrow at his eye and a figure cut down by a horseman, the Carmen says he was cut down by knights including William, and twelfth-century writers say he was struck by an arrow; consequences in the battle: the shield wall broke and English resistance collapsed at dusk, though some housecarls fought on round his body; many fled (the Malfosse incident); his brothers Gyrth and Leofwine had also been killed, so the Godwin family, the most powerful in England, lost its leaders; no experienced adult leader was left - Edgar Atheling, the last male of the House of Wessex, was a teenager and was proclaimed king by some in London but never crowned; Edwin and Morcar did not fight on; William marched via Dover and Canterbury, crossed the Thames at Wallingford (where Archbishop Stigand submitted) and received the submission of Edgar, Archbishop Ealdred and other leaders at Berkhamsted; William was crowned in Westminster Abbey on Christmas Day 1066; Harold's death also seemed to Normans to show God's judgement on an oath-breaker, supporting William's claim; Harold's sons later raided from Ireland (1068 and 1069) but failed; possible judgement: the death was decisive because the English had no strong leader to continue the war, so one battle decided the kingdom.

Question 4

16 marks

'The Battle of Stamford Bridge was the main reason why Harold lost the Battle of Hastings.'

How far do you agree with this statement? Explain your answer.

Model answer

The Battle of Stamford Bridge did weaken Harold, but I only partly agree that it was the main reason he lost at Hastings. It made his task harder, but the battle itself was decided by William's leadership and by Harold's death.

There is a strong case that Stamford Bridge was crucial. On 25 September Harold won a great victory, killing Harald Hardrada and Tostig, but the battle was hard fought and he lost many men, including experienced housecarls who could not be replaced. His army had already marched about 185 miles north in roughly four or five days, and now it had to march back to London and on to Sussex. Worse, the battle kept Harold in the north at exactly the wrong moment: three days later William landed unopposed at Pevensey and had more than two weeks to build castles at Pevensey and Hastings and harry the countryside. The victory may also have made Harold overconfident. He tried to repeat the speed and surprise that had worked against Hardrada, leaving London after only a few days and fighting before all his troops had arrived, while Edwin and Morcar, whose army had been beaten at Fulford, did not come south at all.

However, other factors were also important. The timing of the invasions was a matter of luck as well as Stamford Bridge: contrary winds held William in Normandy until after Harold had sent the fyrd home on 8 September. Harold's own decision to fight quickly was a choice, not something Stamford Bridge forced on him; he could have waited for more troops. Also, Stamford Bridge was not only a disadvantage: it removed Hardrada and Tostig, so Harold could face William without an enemy behind him.

The most important factors were in the battle itself. The English shield wall held on Senlac Hill from about 9 am until late afternoon, which suggests that tiredness after Stamford Bridge was not decisive. What changed the battle was William's leadership. He used a balanced army of archers, infantry and cavalry - the English had no cavalry and few archers. When the Bretons fled and a rumour spread that he was dead, he rallied his men, and his cavalry cut down the English who had broken ranks to chase them. The Normans then used feigned retreats to draw more men out of the line and shot arrows high over the shield wall. Finally, Harold was killed late in the day, after his brothers Gyrth and Leofwine, and the English collapsed.

Overall, Stamford Bridge was an important background reason because it weakened Harold's army and allowed William to land without opposition. But it was not the main reason for the defeat. The battle was close, and it was won by William's leadership and tactics, helped by English indiscipline and decided by Harold's death.

Explanation

Stamford Bridge cost Harold men, energy and time and kept him in the north when William landed, but the English still held the ridge for most of the day, so William's leadership and tactics, Harold's decisions and his death also need weighing. Level 4 explains Stamford Bridge's effects and other factors, shows how they interacted and sustains a judgement; a narrative of both battles is Level 1-2.

Mark scheme
  1. 16 marks

    Levels of response (16 marks).
    Level 4 (13-16 marks): Complex explanation of the effects of Stamford Bridge and of other factors (e.g. William's preparation and leadership, Norman tactics, Harold's decisions, luck and the timing of the invasions), showing how they interacted, with a sustained judgement about the main reason, supported by a range of specific, accurate knowledge.
    Level 3 (9-12 marks): Developed explanation of the effects of Stamford Bridge and at least one other factor, supported by accurate knowledge, with a judgement that may not be fully sustained.
    Level 2 (5-8 marks): Simple explanation of Stamford Bridge or of other factors, e.g. Harold's army was tired after the battle.
    Level 1 (1-4 marks): Basic explanation: general statements with limited knowledge.
    0 marks: nothing worthy of credit.

    Indicative content (not a checklist; credit other valid points): For (Stamford Bridge): the battle (25 September) was hard fought - Harold lost many men, including experienced housecarls; the army had marched about 185 miles north in roughly four or five days and then had to march back to London and on to Sussex; Harold was in the north when William landed unopposed at Pevensey on 28 September, giving William over two weeks to build castles and harry Sussex; the victory may have made Harold overconfident, encouraging him to try speed and surprise again and to fight before his army was ready; Edwin and Morcar, already beaten at Fulford, did not come south. Against (other factors): Fulford (20 September) had already weakened the north; luck and timing - the wind delayed William, the fyrd was disbanded on 8 September; Harold's own decisions - leaving London after only a few days, fighting before reinforcements arrived; the battle at Hastings was close - the shield wall held from about 9 am to the late afternoon, which suggests tiredness was not decisive; William's leadership - planning, the papal banner, rallying his men after the rumour of his death, the feigned retreats, high-angle archery; the Norman army's cavalry and archers compared with the English lack of both; English indiscipline - the fyrd chasing the Bretons; Harold's death late in the day and the deaths of Gyrth and Leofwine; also Stamford Bridge removed Hardrada and Tostig, so Harold could fight William alone - it was not only a disadvantage. Possible judgements: Stamford Bridge weakened Harold and put him in the wrong place, but the battle was decided by William's leadership and Harold's death; or the combination of Stamford Bridge and the timing of William's landing was decisive.

Ready to try the rest? Every answer you write is marked against the mark scheme, so you can see exactly where the marks are.

AI Tutor Hints first, answers after you try

Hi! Stuck? Ask me for a hint and I’ll help you work it out. Once you’ve checked your answer I can explain exactly where the marks are.