Level:
Correct: 0
Incorrect: 0
Marks: 0/0
Exam Practice
Subject:
Topics:
AQA GCSE History (Edward I) Smart practice A mixed round aimed at your weak spots
Unit 1
Part one: Government, the rights of King and people
Unit 2
Part two: Life in Medieval England
Unit 3
Part three: Edward I’s military campaigns in Wales and Scotland
Unit 4
Part four: The historic environment of Medieval England
Avg
score:
–
Topics
done:
0/10

Medieval warfare, tactics and technology

Practise 40 exam-style questions on Medieval warfare, tactics and technology for AQA GCSE History (Edward I). Write your answer as you would in the exam and get it marked in seconds against the mark scheme, point by point, with an AI tutor on hand if you get stuck.

  • 40 questions
  • 1–16 marks each
  • Instant marking
  • No sign-up needed
20 questions, marked as you go

Sample questions with model answers

Here are 4 of the questions in this topic, each with a model answer, an explanation of why it earns the marks and the mark scheme an examiner would use.

Question 1

2 marks

Give two pieces of armour that an English knight might wear in battle around 1300.

Model answer

A knight would wear a mail hauberk, a long shirt of interlinked iron rings, over a padded aketon, and a great helm, a heavy closed helmet that covered his whole head.

Explanation

Around 1300 knights still relied mainly on mail over padding, with a closed helmet and a shield; plate pieces such as knee-guards were being added, but full plate armour came over a century later. A cloth surcoat with the knight's coat of arms was worn over the mail so that he could be recognised with his face covered.

Mark scheme
  1. 1 mark

    Any one valid piece, e.g. a mail hauberk (a long-sleeved shirt of interlinked iron rings); mail coif (hood); mail chausses (leggings); mail mittens (mufflers); a padded aketon or gambeson worn under the mail; a great helm (closed helmet); a kettle hat or bascinet; a shield (heater shield); plate knee-guards (poleyns), greaves or other plate pieces; a coat of plates.

    One mark per piece, max 2.

  2. 1 mark

    A second, different valid piece from the list.

    max 2. Do not accept two pieces of the same kind (e.g. 'mail shirt' and 'hauberk'). A surcoat (cloth tunic with the knight's arms) is not armour: accept it only as a third item. Do not accept full plate armour, which developed in the late 14th and 15th centuries.

Question 2

8 marks

Interpretation A: from a museum guide to medieval arms and armour, written in 2010. (Written for practice.)

'Covered in mail from head to foot, with a great helm over his face and a shield on his arm, a knight of 1300 was almost invulnerable. Arrows and spears glanced off him, and only another knight with sword or lance could hope to bring him down. This is why so few knights died in battle.'

How convincing is Interpretation A about the protection that armour gave knights around 1300?

Explain your answer based on your contextual knowledge and what it says in Interpretation A.

Model answer

Interpretation A is convincing up to a point. Around 1300 an English knight wore a mail hauberk, with a mail hood, mittens and leggings, over a thick padded aketon, a great helm that enclosed his whole head, and a shield; plate pieces such as knee-guards were also being added. Mail over padding gave good protection against sword cuts and glancing blows, and armour was so valuable that it was expensive to buy. It is also true that relatively few knights died in battle. At Dunbar in 1296, for example, many Scottish nobles were captured rather than killed.

However, the claim that a knight was 'almost invulnerable' is not convincing. Arrows from longbows and, especially, crossbow bolts could pierce mail at short range. Most warhorses had little protection and were easily wounded or killed, leaving the knight on foot and vulnerable; the king paid compensation for the many horses lost on campaign. Spearmen in tight formations could stop and kill mounted men, and terrain could be deadly: at Stirling Bridge in 1297 many of the English vanguard were cut down on the soft ground or drowned in the Forth, and at Moel-y-don in 1282 knights fleeing across the Menai Strait drowned because they were weighed down by their armour. At Courtrai in 1302 Flemish foot soldiers killed large numbers of French knights. The great helm limited sight and breathing, and armour was hot and tiring in a long fight.

The statement that few knights died 'because' of their armour is also misleading. Knights were valuable prisoners who could be ransomed, so their enemies often preferred to capture them, while ordinary foot soldiers were more likely to be killed.

Overall, Interpretation A is convincing that armour gave knights much better protection than most soldiers had, but it is unconvincing to call them almost invulnerable, because missiles, spearmen, terrain and water could all kill them, and the custom of ransom explains much of their survival.

Explanation

Mail, padding, the great helm and early plate pieces protected well, but bolts and arrows at close range, unprotected horses, spearmen, bogs and water (Stirling Bridge, Moel-y-don, Courtrai) killed many knights, and ransom explains much of their survival. Level 4 needs a sustained judgement on how far the interpretation is convincing.

Mark scheme
  1. 8 marks

    Levels of response (8 marks).
    Level 4 (7-8 marks): Complex evaluation of Interpretation A with a sustained judgement about how convincing it is, based on precise knowledge of the armour of about 1300 and how well it protected, weighed against its weaknesses (arrows and bolts at short range, horses, terrain and water, heat and exhaustion, being unhorsed) and the real reasons few knights died (ransom), e.g. convincing that mail and padding gave good protection but wrong that knights were almost invulnerable.
    Level 3 (5-6 marks): Developed evaluation of Interpretation A, using relevant contextual knowledge to explain why one or more of its claims are or are not convincing, e.g. explains mail, padding and the great helm, or explains how knights were killed at Stirling Bridge or Moel-y-don.
    Level 2 (3-4 marks): Simple evaluation of Interpretation A supported by some factual knowledge, e.g. it is convincing because mail protected against sword cuts.
    Level 1 (1-2 marks): Basic analysis of Interpretation A: describes or paraphrases what it says.
    0 marks: nothing worthy of credit.

    Indicative content (not a checklist; credit other valid points): Supports: around 1300 knights wore a mail hauberk with coif, mittens and chausses over a padded aketon, a great helm and a shield, with plate pieces such as knee-guards being added; mail and padding together protected well against cuts and glancing blows; knights were often captured for ransom rather than killed - at Dunbar (1296) many Scottish nobles were taken prisoner; the cost of armour shows its value. Challenges: arrows from longbows and especially crossbow bolts could pierce mail at short range; most horses were unarmoured or lightly protected and were easily killed or wounded, leaving a knight on foot and vulnerable - the king paid compensation for many horses lost on campaign; spearmen in schiltrons could stop and kill mounted men; at Stirling Bridge (1297) many of the English vanguard were killed or drowned in the Forth; at Moel-y-don (1282) knights retreating across the Menai Strait drowned, weighed down by armour; at Courtrai (1302) many French knights were killed by Flemish infantry; the great helm limited sight and breathing and armour was hot and tiring; a knight unhorsed or trapped in mud was in great danger. 'Few knights died' owed much to the custom of ransom, which did not apply equally to foot soldiers. Judgement.

Question 3

8 marks

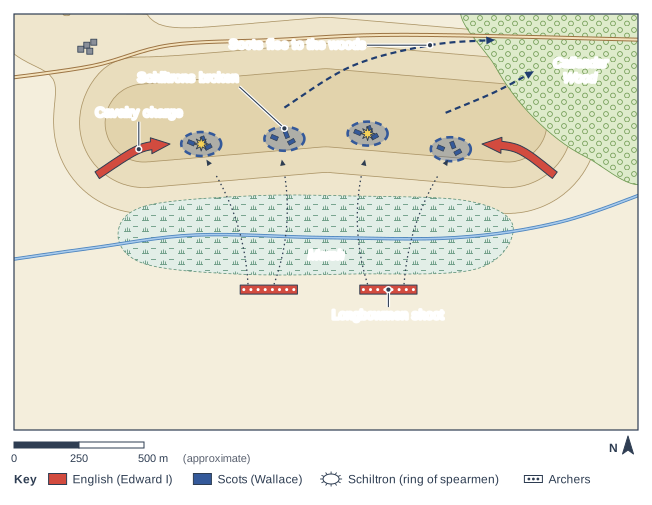
Figure 1 is a plan of the final stage of the Battle of Falkirk (22 July 1298).

Write an account of the ways in which Edward I's army won the Battle of Falkirk.

Schematic battle plan of armies on and below a slope. Schematic battle plan (north at the top; scale bar 0-500 m, approximate). Rising ground runs across the upper middle of the map; below it an area shaded with small tufts, with a stream through it, crosses the map; an area shaded with small circles fills the top right corner, and buildings stand at the top left on a road running across the top. Narrow dotted red blocks stand below the tufted area, with dotted curved arrows rising from them to the rings, which are drawn broken; broad red arrows strike the rings from both ends, with yellow stars; dashed blue arrows lead from the rings to the area shaded with small circles at the top right. A key under the map gives: red, English (Edward I); blue, Scots (Wallace); an oval ring with spikes, Schiltron (ring of spearmen); a narrow block with dots, Archers. The label "Marsh" is written on the area shaded with small tufts across the middle of the map; the label "Callendar Wood" is written on the area shaded with small circles at the top right; the label "Longbowmen shoot" points to the narrow dotted red blocks below the tufted area, with dotted curved arrows rising to the rings; the label "Cavalry charge" points to the broad red arrows striking the rings from both ends; the label "Schiltrons broken" points to the broken blue rings (dashed outlines) along the slope; the label "Scots flee to the woods" points to the dashed blue arrows heading for the area shaded with small circles at the top right.

Model answer

After the English defeat at Stirling Bridge in 1297, Edward led a very large army into Scotland himself in 1298. It included cavalry under the earls and under Bishop Antony Bek of Durham, thousands of infantry, many of them Welsh, and large numbers of longbowmen and crossbowmen. The campaign nearly failed before the battle: the army was short of food, and Edward was considering withdrawing when he learned that Wallace was waiting near Falkirk. According to one chronicler, Edward's horse trod on him in the night and broke two of his ribs, but he still led the attack the next day.

Wallace had chosen a strong defensive position. He drew up his spearmen in four schiltrons, dense rings protected by stakes roped together, on rising ground behind a marsh and a burn. Archers stood between the schiltrons and the Scottish cavalry waited behind, near Callendar Wood.

The English cavalry could not cross the marsh, so they rode round both ends of it. At this point the Scottish cavalry rode off without fighting, leaving the Scottish archers exposed, and the English knights cut them down. However, the schiltrons held firm, and the cavalry could not break the hedges of spears.

Edward then used his archers. The longbowmen and crossbowmen came forward and shot volleys into the packed schiltrons, which could neither move nor shoot back. As men fell and gaps opened in the rings, the English cavalry charged again and broke them. The surviving Scots fled into Callendar Wood, and their losses were heavy.

The victory came from Edward's numbers and from combining archers with cavalry against static formations that had lost their own cavalry and archer support. Wallace escaped, but he resigned as Guardian of Scotland. Edward, still short of supplies, could not follow up the victory and complete the conquest, and afterwards the Scots avoided pitched battles.

Explanation

The English cavalry rode round the marsh, the Scottish cavalry fled and the Scottish archers were cut down, then archers and crossbowmen shot gaps in the static schiltrons for the final cavalry charge. Level 4 is a coherent account that explains why these stages led to victory, using knowledge beyond the plan.

Mark scheme
  1. 8 marks

    Levels of response (8 marks).
    Level 4 (7-8 marks): Complex analysis of the causes of the English victory in a coherent and well-structured narrative of the battle, explaining how Edward's army overcame the Scots' strong position (the cavalry going round the marsh, the flight of the Scottish cavalry, the destruction of the Scottish archers, the archers and crossbowmen shooting into the schiltrons, the final cavalry charge) and why this worked, supported by precise knowledge beyond Figure 1.
    Level 3 (5-6 marks): Developed analysis in a structured narrative, explaining two or more stages of the battle with accurate knowledge.
    Level 2 (3-4 marks): Simple analysis in a narrative of one or more stages, e.g. the archers shot the Scots and the knights charged.
    Level 1 (1-2 marks): Basic analysis: a general narrative, e.g. Edward attacked and won; or describes Figure 1 without explanation.
    0 marks: nothing worthy of credit.

    Indicative content (not a checklist; credit other valid points): Background: after Stirling Bridge (1297) Edward led a very large army into Scotland himself, with thousands of infantry including many Welsh, cavalry under the earls and under Bishop Antony Bek of Durham, longbowmen and crossbowmen; the army was short of food and Edward was considering withdrawal when he learned that Wallace was near Falkirk; according to one chronicler, Edward's horse trod on him in the night and broke two of his ribs, but he still led the attack. Scottish position: Wallace placed four schiltrons of spearmen, protected by stakes roped together, on rising ground behind a marsh and a burn, with archers between them and cavalry behind, near Callendar Wood. Stage 1: the English cavalry, finding the marsh in the way, rode round both ends of it. Stage 2: the Scottish cavalry rode off without fighting; the Scottish archers between the schiltrons were cut down; the schiltrons held firm against the cavalry charges. Stage 3: Edward brought up his longbowmen and crossbowmen, who shot into the packed schiltrons; when gaps opened, the cavalry charged again and broke them; the Scots fled into the woods with heavy losses. Reasons: numbers; combined use of archers and cavalry; the static schiltrons without support. Results: Wallace escaped but resigned as Guardian; Edward, short of supplies, could not complete the conquest; the Scots avoided pitched battles afterwards.

Question 4

16 marks

'Siege warfare was more important than battles in Edward I's wars.'

How far do you agree with this statement?

Explain your answer.

Model answer

Siege warfare was more important than battles in Edward I's wars overall, because his enemies usually avoided battle and conquest meant taking and holding castles. However, a few battles were decisive turning points, and battles and sieges were closely linked.

The case for siege warfare is strong. The Welsh rarely fought pitched battles, and after their defeat at Falkirk in 1298 neither did the Scots, so the wars were decided by strongpoints. In Wales in 1283 Edward's forces captured the last Welsh castles, Dolwyddelan in January and Castell y Bere in April. He then held Wales with castles: Flint, Rhuddlan, Builth and Aberystwyth from 1277, Conwy, Caernarfon and Harlech from 1283 and Beaumaris from 1295. In the revolt of 1294-95 Harlech held out with fewer than 40 men. In Scotland, Berwick was stormed in 1296 and Edinburgh Castle surrendered after a bombardment; Caerlaverock fell in 1300 and Bothwell in 1301 with the help of a great siege tower; and the fall of Stirling Castle in 1304, after bombardment by the Warwolf, completed the conquest. Edward invested enormous sums in siege engines, engineers and castle-building, which shows how important he thought sieges were.

However, some battles were turning points. Edward's victory at Evesham in 1265 destroyed Simon de Montfort. The death of Llywelyn at Orewin Bridge in 1282 broke Welsh resistance, and Maes Moydog in 1295 weakened Madog's revolt. In Scotland, the English victory at Dunbar in 1296 caused the collapse of Scottish resistance, while the defeat at Stirling Bridge in 1297 lost the English control of most of Scotland in a single day. Falkirk in 1298 destroyed Wallace's power.

Battles and sieges were connected. After Dunbar, Scottish castles surrendered because there was no army to relieve them, so the battle made the sieges easy. After Stirling Bridge, the Scots took Stirling Castle. And sieges could bring about battles: after Edward's death, the English army was marching to relieve Stirling Castle when it was defeated at Bannockburn in 1314. Blockade and devastation, as in the starving of Gwynedd in 1277 and the raiding of Scottish lands, also wore enemies down without either battles or sieges.

Overall, I largely agree. Battles were rare but could change a war in a day, as Dunbar and Stirling Bridge show. But Edward's wars were mostly won and lost through sieges, castles and blockade, because his enemies avoided battle and lasting control depended on holding strongpoints. Siege warfare was therefore the more important.

Explanation

With the Welsh and later the Scots avoiding battle, Edward's wars turned on sieges and castles (Dolwyddelan, Harlech, Caerlaverock, Bothwell, Stirling 1304), but Evesham, Orewin Bridge, Dunbar, Stirling Bridge and Falkirk were turning points. Level 4 needs a sustained judgement showing how battles and sieges were linked.

Mark scheme
  1. 16 marks

    Levels of response (16 marks).
    Level 4 (13-16 marks): Complex explanation of the importance of sieges and castles and of battles in Edward's wars in Wales and Scotland (and against the Montfortians and in revolts), leading to a sustained judgement about which mattered more, supported by a wide range of accurate and specific knowledge and showing how sieges and battles were linked.
    Level 3 (9-12 marks): Developed explanation of sieges and of battles, supported by accurate knowledge, with a judgement that may not be fully sustained.
    Level 2 (5-8 marks): Simple explanation of sieges or battles, with some accurate knowledge.
    Level 1 (1-4 marks): Basic explanation: general statements about warfare, with limited knowledge.
    0 marks: nothing worthy of credit.

    Indicative content (not a checklist; credit other valid points): Sieges (for): the Welsh and, after 1298, the Scots avoided pitched battle, so wars were decided by taking and holding strongpoints; Wales - Dolwyddelan (January 1283) and Castell y Bere (April 1283) taken; Edward's own castles (1277, 1283, 1295) held Wales, and Harlech held out in 1294-95; Scotland - Berwick stormed (1296), Edinburgh surrendered after bombardment (1296), Caerlaverock (1300), Bothwell (1301, siege tower), Stirling (1304, the Warwolf) completed the conquest; huge investment in engines, engineers and castle-building; Henry III's siege of Kenilworth (1266) ended the Barons' War resistance. Battles (for): battles could be decisive - Evesham (1265) destroyed Montfort; Llywelyn's death at Orewin Bridge (1282) broke Welsh resistance; Dunbar (1296) caused the Scottish collapse and the surrender of castles; Stirling Bridge (1297) lost the English control of Scotland; Falkirk (1298) broke Wallace's power and led the Scots to avoid battle; Maes Moydog (1295) weakened Madog's revolt. Linking: battles made sieges possible (castles surrendered after Dunbar) and sieges forced battles (Bannockburn, 1314, was fought to relieve Stirling); blockade and devastation also mattered. Judgement: e.g. sieges were more important overall because they made conquest permanent and battles were rare, but a few battles were turning points.

Ready to try the rest? Every answer you write is marked against the mark scheme, so you can see exactly where the marks are.

AI Tutor Hints first, answers after you try

Hi! Stuck? Ask me for a hint and I’ll help you work it out. Once you’ve checked your answer I can explain exactly where the marks are.